How to Migrate from WordPress to Shopify Without Losing Traffic, SEO or Sales
.avif)

How to Migrate from WordPress to Shopify Without Losing Traffic, SEO or Sales
Migrating from WordPress to Shopify means transferring your store's products, customer data, orders, blog posts and URLs from a self-hosted CMS to a fully hosted ecommerce platform.
Done correctly, it takes anywhere from 1 day for a small store to 6 weeks for a large one with thousands of SKUs and order history.
This blog is for WordPress and WooCommerce store owners who want to move to Shopify without losing their SEO rankings, data, or momentum.
You'll learn exactly what to migrate, which tools to use, how to set up 301 redirects, and what to do the moment your new Shopify store goes live.
Why Migrate from WordPress to Shopify?
WordPress with WooCommerce works, but it comes with a maintenance overhead that compounds over time. Plugin conflicts, security patches, hosting issues and slow page load times are recurring problems for WooCommerce stores.
Shopify is a hosted, all-in-one ecommerce platform. It handles server management, security updates and payment processing natively, so you focus on selling.
As of 2026, Shopify powers over 6.9 million stores globally, which gives it an ecosystem of apps, themes and integrations that WooCommerce cannot match in terms of ecommerce-specific depth.
Shopify Markets also handles multi-currency selling across AED, SAR, KWD, BHD, QAR, and OMR.
Here is a direct comparison of the two platforms:
What You Can (and Cannot) Migrate from WordPress to Shopify
Before you start, know what transfers automatically and what needs manual work. This is the most common source of surprises mid-migration.
What Transfers Automatically
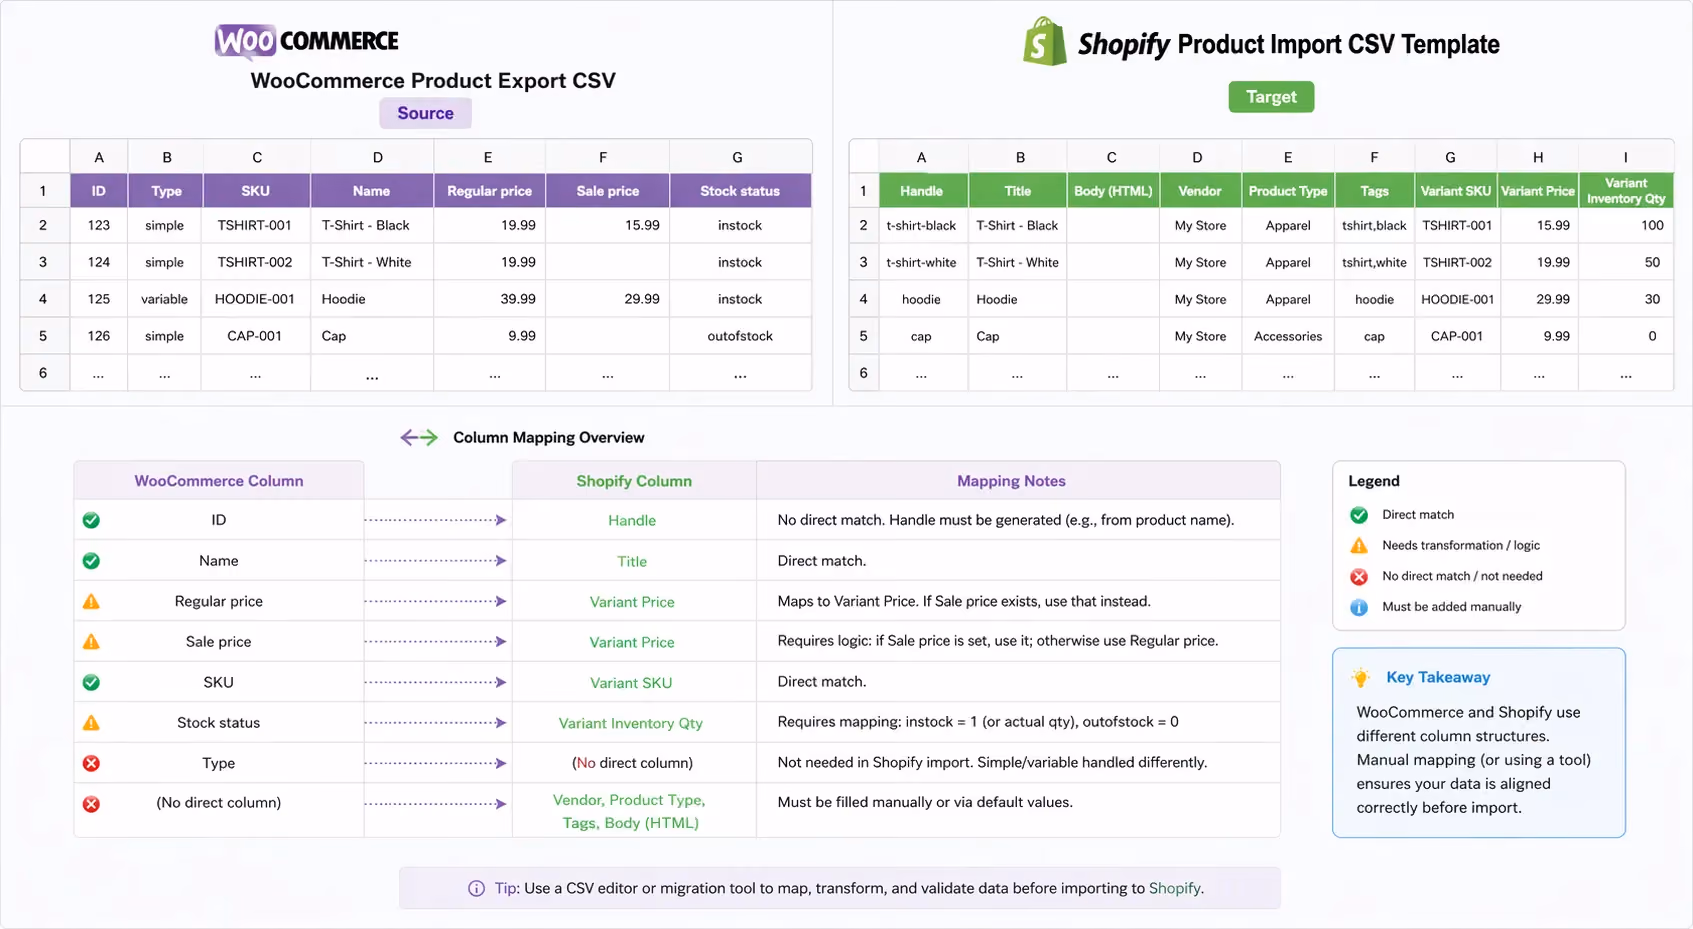
Products transfer with their titles, descriptions, prices, SKUs, images, categories, and tags. Customer data including names, emails, and addresses carries over cleanly, as does order history.
Blog posts and pages migrate with their URL slugs, which you will use later for redirect mapping. Meta titles and descriptions also transfer when you use the right SEO apps.
What Needs Manual Work
Your WordPress theme and design do not move to Shopify you rebuild that from scratch, which is actually an advantage. Shortcodes and custom plugin output need to be recreated using Shopify's native tools or equivalent apps.
Some custom WooCommerce fields require manual mapping to Shopify metafields. Images embedded inside blog post content frequently go missing and need to be re-uploaded. Navigation menus, footer links, and any custom post types from plugins all need to be rebuilt manually.
One thing worth flagging specifically: customer passwords cannot move to Shopify for security reasons. Customers will need to reset their password the first time they log into your new store.
Choose Your Migration Method: Apps vs Manual vs Agency
The right migration method depends on your store's size and complexity. There is no single correct answer, but there is usually a clearly wrong one for your situation.
Automated Migration Apps
Automated migration apps are the right choice for most stores. They handle the heavy lifting of field mapping, image transfer, and order history, and they reduce the chance of manual errors.
Matrixify is the most flexible option for large product catalogs and blog-heavy sites. It lets you map custom fields and import WordPress XML directly.
Cart2Cart works well for WooCommerce stores with large order histories, and its guided workflow makes it accessible even without technical experience.
LitExtension is a solid alternative with 24/7 live support, which helps if you are migrating during a busy sales period.
Shopify Store Importer is free and built into Shopify, it handles basic WooCommerce exports and is fine for stores with fewer than 100 products and no complex data. You can find Matrixify and Cart2Cart on the Shopify App Store.
CSV Import and Export (Manual Method)
The manual CSV method is practical for small stores with under 200 products, no complex variants, and limited order history.
The process involves exporting your WooCommerce products to CSV, cleaning the file to match Shopify's column format, and importing it via Shopify Admin.
The risk is that images and metadata often break or go missing, and any custom field not supported by Shopify's native CSV format needs to be handled separately. Budget extra time for fixing formatting errors after import.
Hiring a Shopify Migration Agency
For large stores, complex custom builds, or businesses that need a full redesign alongside migration, an agency is the right call.
It is also the right call if your store has Arabic content, UAE-specific compliance requirements, or if SEO risk is high enough that a mistake would be costly.
Many GCC businesses prefer agency-led migrations for precisely this reason: the cost of getting it wrong is higher than the cost of getting it done properly.
How to Migrate WordPress to Shopify: Step-by-Step
This section walks you through the full process in the correct order. Do not skip steps or reorder them. The sequence matters, especially steps 6 and 7, which protect your SEO.
Step 1: Back Up Your WordPress Site
Before touching anything, create a full backup of your existing WordPress site. If something goes wrong mid-migration, you need a restore point.
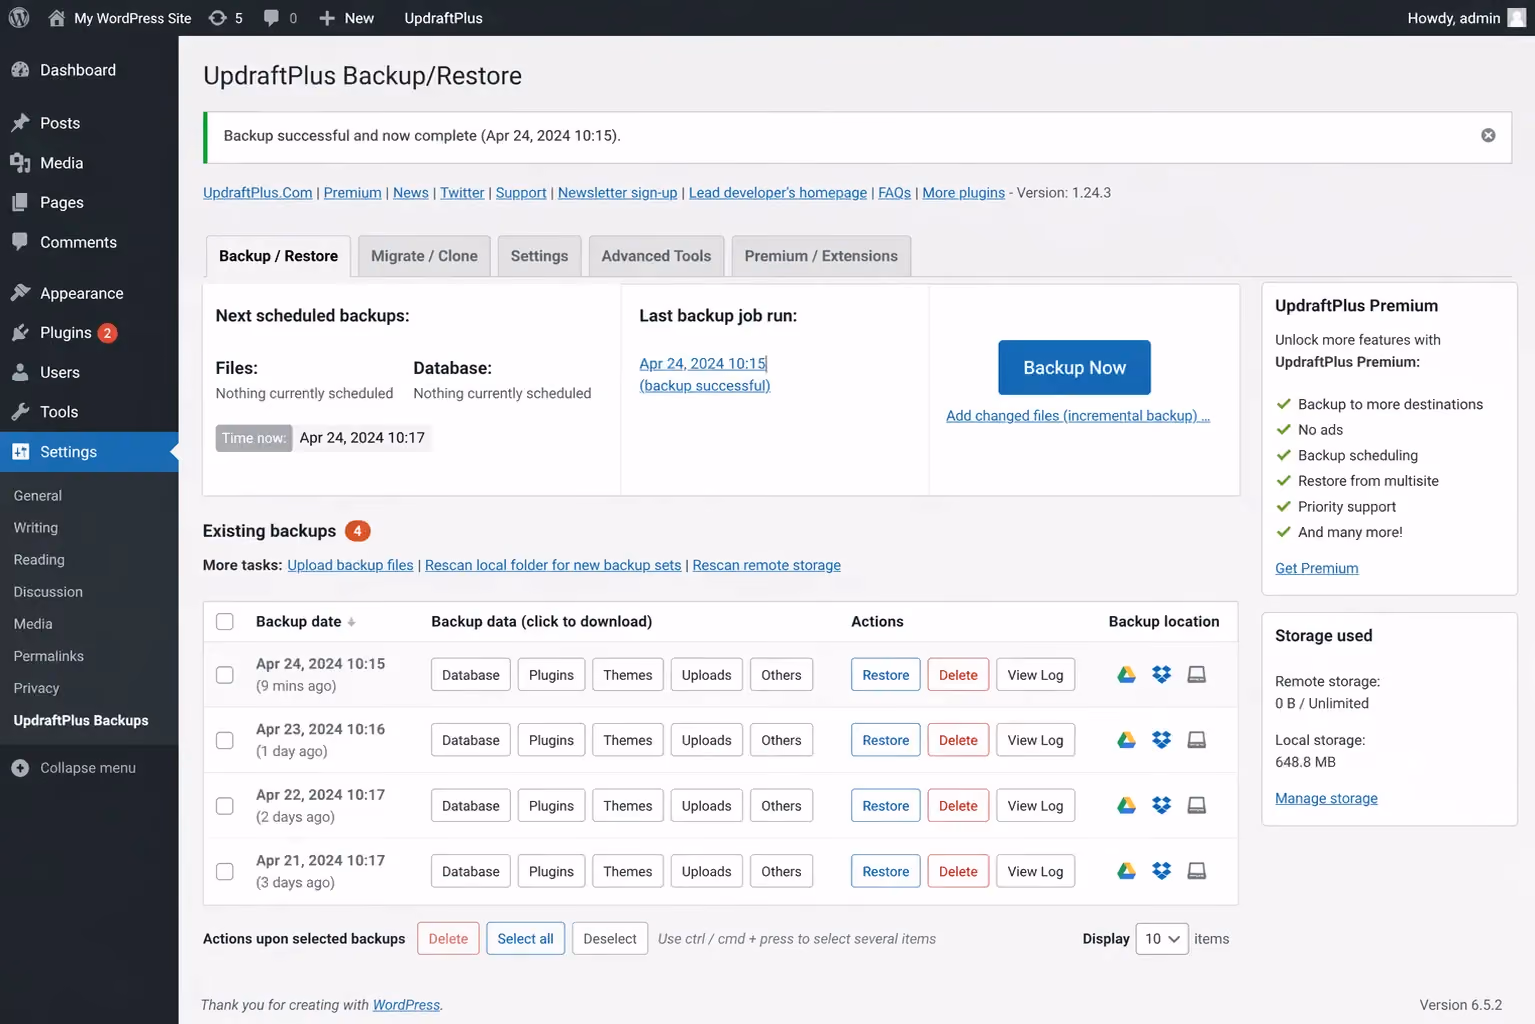
Use UpdraftPlus or Jetpack Backup to download a complete backup including your database, uploads folder, themes, and plugins.
The backup should include your WordPress database (posts, products, orders, customers), all uploaded media files, theme files, and plugin configurations. Store the backup file in Google Drive or Dropbox not just on your local machine.
Do not proceed to step 2 until this backup is confirmed and stored safely.
Step 2: Set Up Your Shopify Store
Create a new Shopify account at shopify.com. The Basic plan at $39/month is enough to start your migration and test everything before going live.
Initial Configuration
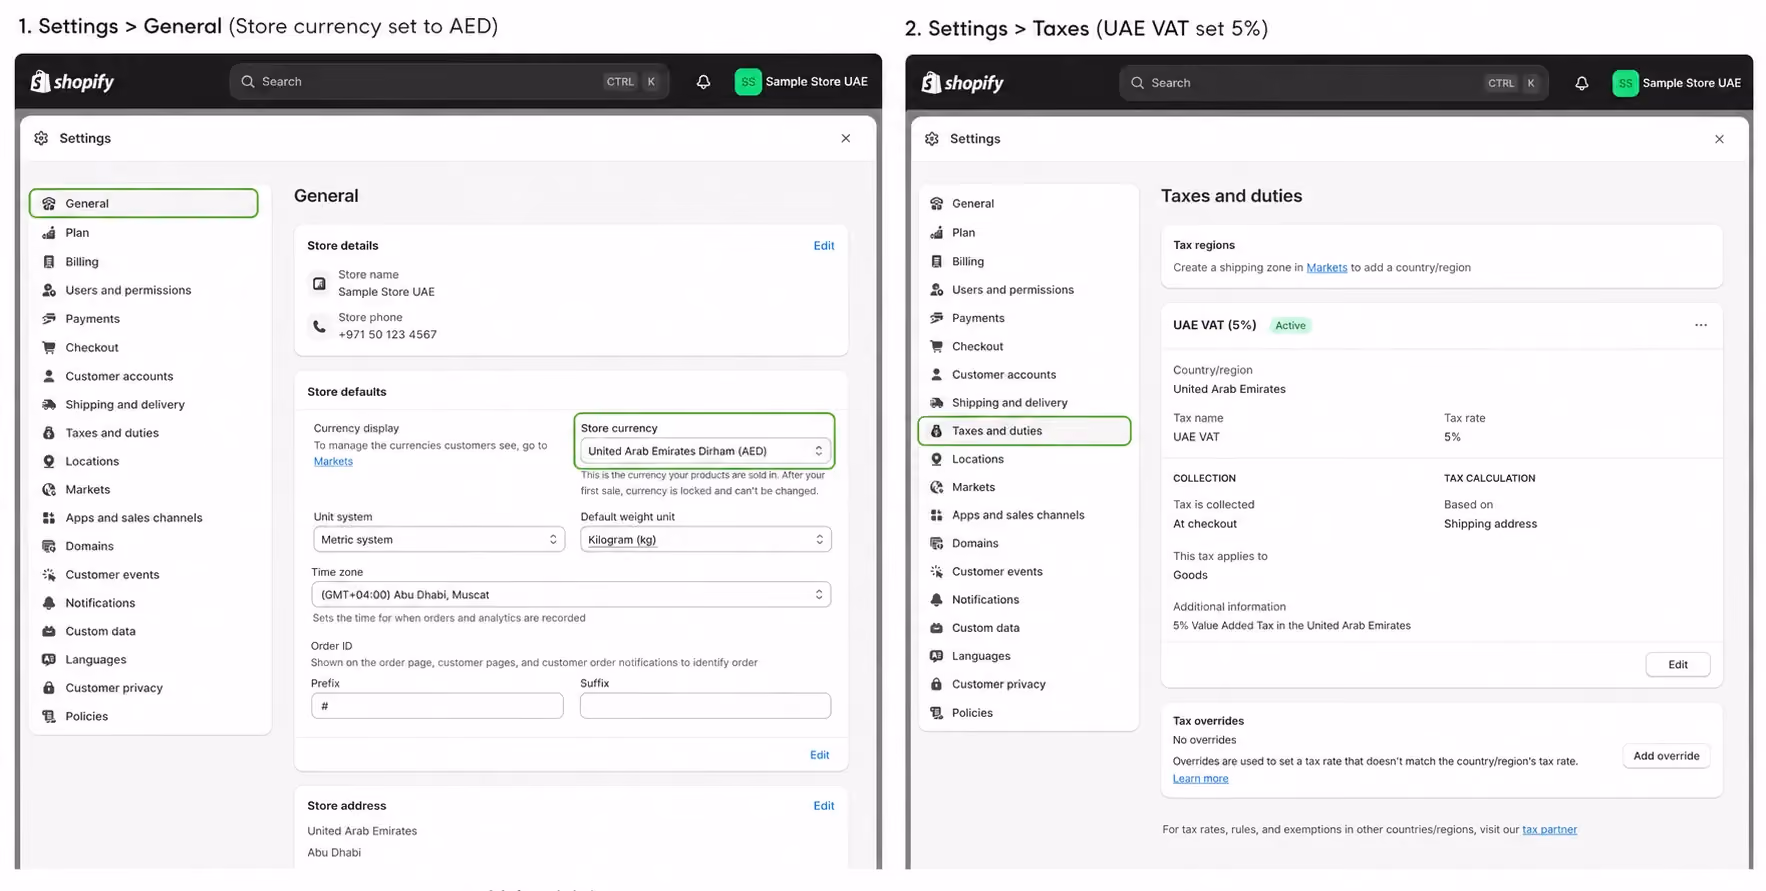
Before importing any data, choose or purchase a theme Dawn is free, fast and well-suited for migration testing. Set your store currency and configure tax settings. Set your language preferences and connect a payment gateway.
If you are selling across the GCC, enable Shopify Markets under Settings to handle multi-currency pricing in SAR, KWD, QAR, BHD, and OMR from a single store.
Step 3: Export Your WordPress Data
Export your data from WordPress before importing anything into Shopify. You will need separate exports for different data types.
Exporting Pages and Blog Posts
Go to WordPress Admin > Tools > Export, then select "All content" or specific post types. This generates an XML file that contains your pages and blog post content.
Exporting WooCommerce Data
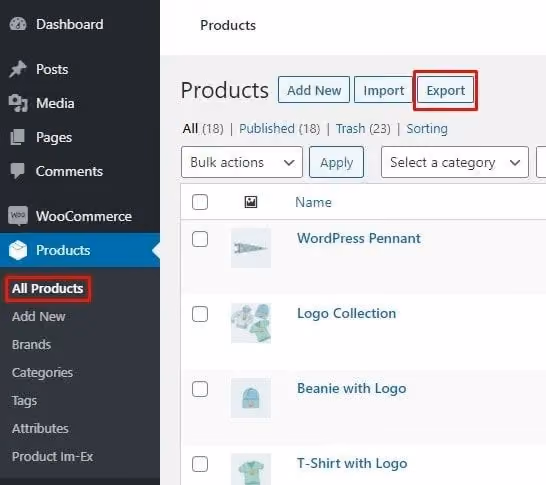
For products, go to WooCommerce > Products > Export, select all columns, and export as CSV. Follow the same process for customers under WooCommerce > Customers > Export, and for orders under WooCommerce > Orders > Export.
If you are using Matrixify, it has a dedicated WordPress importer plugin that handles XML exports with more accuracy than the native Shopify importer worth using for blog-heavy sites. Keep all exported files organized in a single folder. You will need them in the next step.
Step 4: Import Data into Shopify
With your data exported and your Shopify store configured, you can start the import.
Using Shopify Store Importer (Small Stores)
In Shopify Admin, go to Apps > Shopify Store Importer, upload your WooCommerce XML or CSV export, and follow the prompts. Review the mapping before confirming to make sure fields are aligned correctly.
Using Matrixify or Cart2Cart (Larger Stores)
Install the app from the Shopify App Store, connect it to your WordPress/WooCommerce site, and follow the guided migration flow. These apps let you map custom WooCommerce fields to Shopify metafields, which is critical for preserving product data that does not have a direct equivalent in Shopify.
Post-Import Verification
After any import, do a thorough check. Verify that product counts match between your WooCommerce export and what landed in Shopify.
Check that images have transferred correctly; broken images are the most common post-import issue. Confirm product variants, prices, and SKUs are accurate, and check customer and order records for completeness.

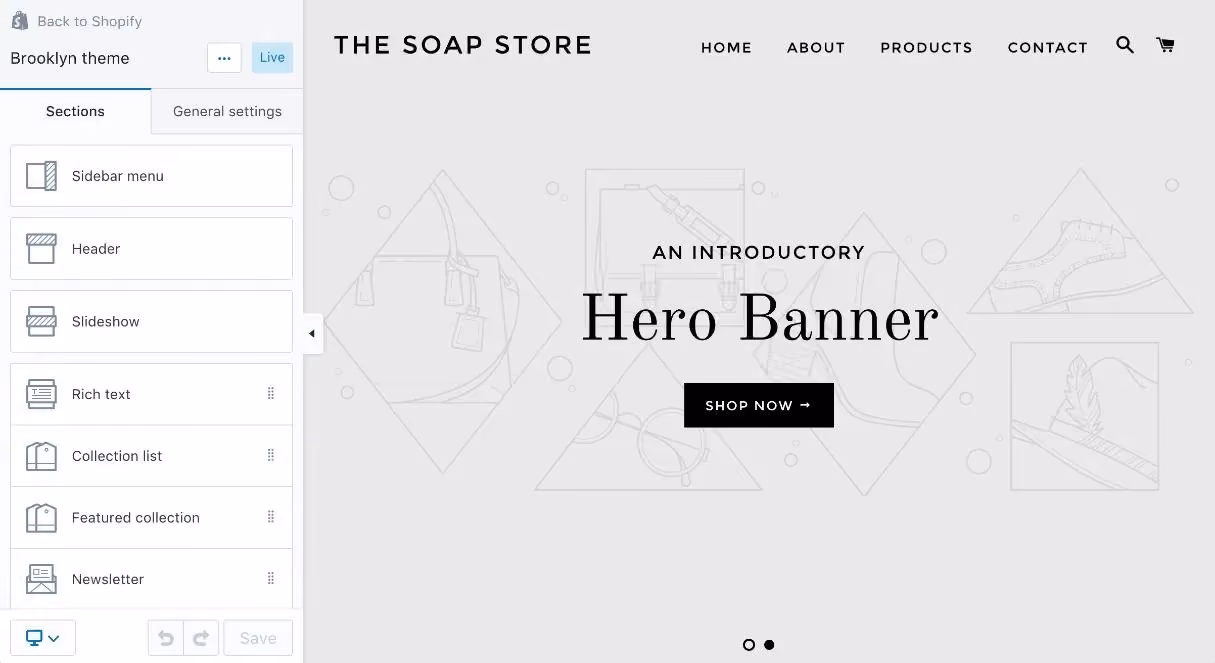
Step 5: Set Up Your Shopify Theme and Customize Design
Your WordPress theme does not transfer. You are starting fresh on Shopify's theme system, which is actually an advantage since it forces a clean design reset.
Dawn, Shopify's free flagship theme, is fast, mobile-first, and supports RTL for Arabic content. Paid themes from the Shopify Theme Store offer more layout options and industry-specific features.
What to Rebuild Manually
After installing a theme, you need to manually rebuild your primary navigation and mega menus, footer links and information columns, homepage sections and featured product blocks, About, Contact, and Policy pages, and any landing pages that were on WordPress. Use Shopify's visual theme editor under Online Store > Themes > Customize to configure each section. It is drag-and-drop and does not require coding for standard layouts.
Step 6: Set Up 301 Redirects to Protect SEO
This is the most important SEO step in the entire migration. Without 301 redirects, every page that changed URL will return a 404 error in Google's index, which means lost rankings, lost backlinks, and lost traffic. A 301 redirect tells search engines that a page has permanently moved to a new URL, and Google transfers the page's SEO value to the new URL when a proper redirect is in place.
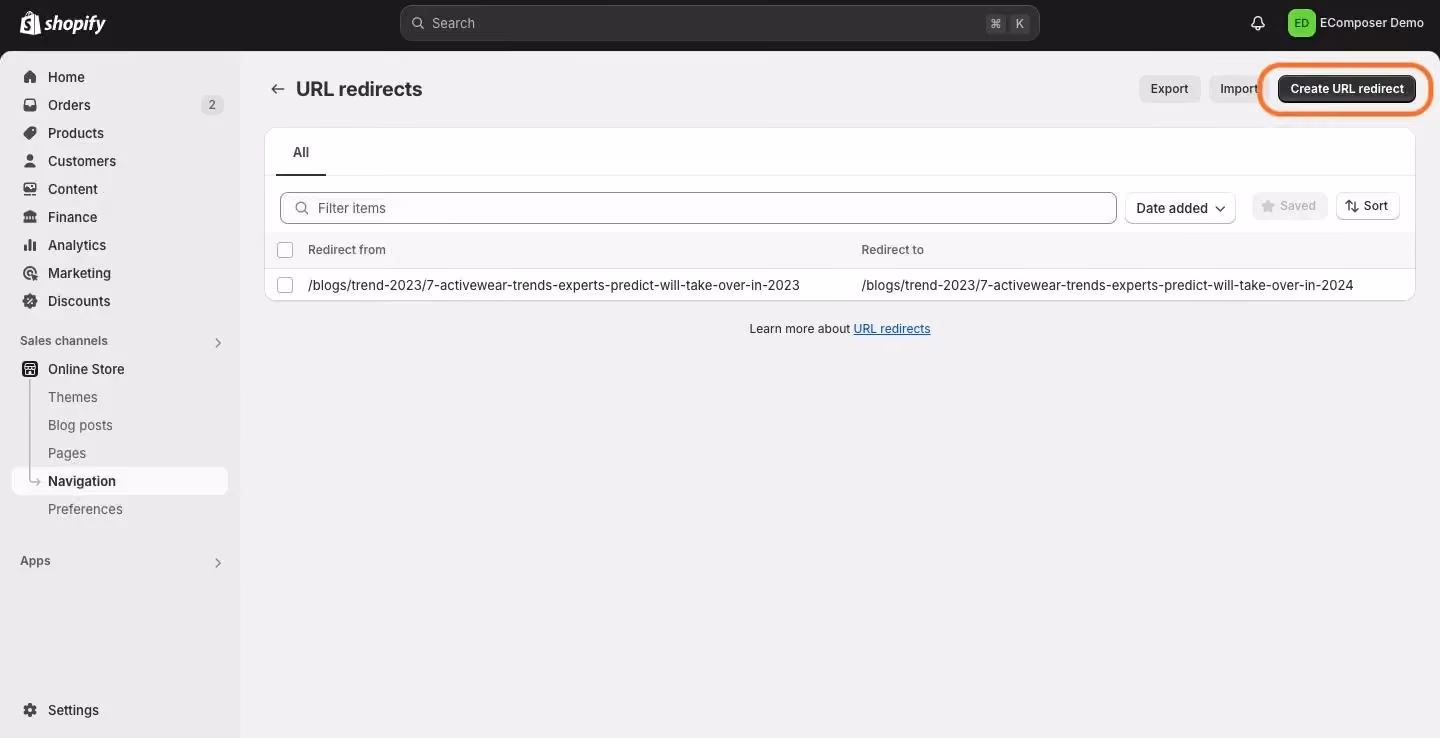
Where to Set Up Redirects in Shopify
Go to Shopify Admin > Online Store > Navigation > URL Redirects. You can add redirects one at a time or bulk upload via CSV.
Common URL Pattern Changes
When moving from WordPress to Shopify, your URL structure will change in predictable ways. Product pages shift from /product/item-name to /products/item-name. Category pages move from /product-category/category-name to /collections/category-name. Blog posts go from /blog/post-name to /blogs/news/post-name. The generic shop URL /shop/ maps to /collections/all.
How to Build Your Redirect List
Build a spreadsheet with every old URL in column A and every new URL in column B. Export it as CSV and upload it to Shopify's URL Redirects section.
For large sites, use Screaming Frog or a sitemap crawler to pull a complete list of WordPress URLs before you decommission anything. The Shopify Help Center guide on redirecting URLs provides additional detail on bulk import formatting.
Step 7: Migrate SEO Metadata and Settings
Redirects protect your existing rankings. This step ensures your new Shopify pages have the right titles, descriptions, and technical SEO in place going forward.
Updating Metadata Per Page
For each product, collection, and page in Shopify, re-enter the meta title (keep the same as WordPress or improve on it), the meta description, and image alt text which is often lost during migration. For bulk editing, install Plug In SEO or Smart SEO from the Shopify App Store. Both allow spreadsheet-style editing of metadata across your entire product catalog.
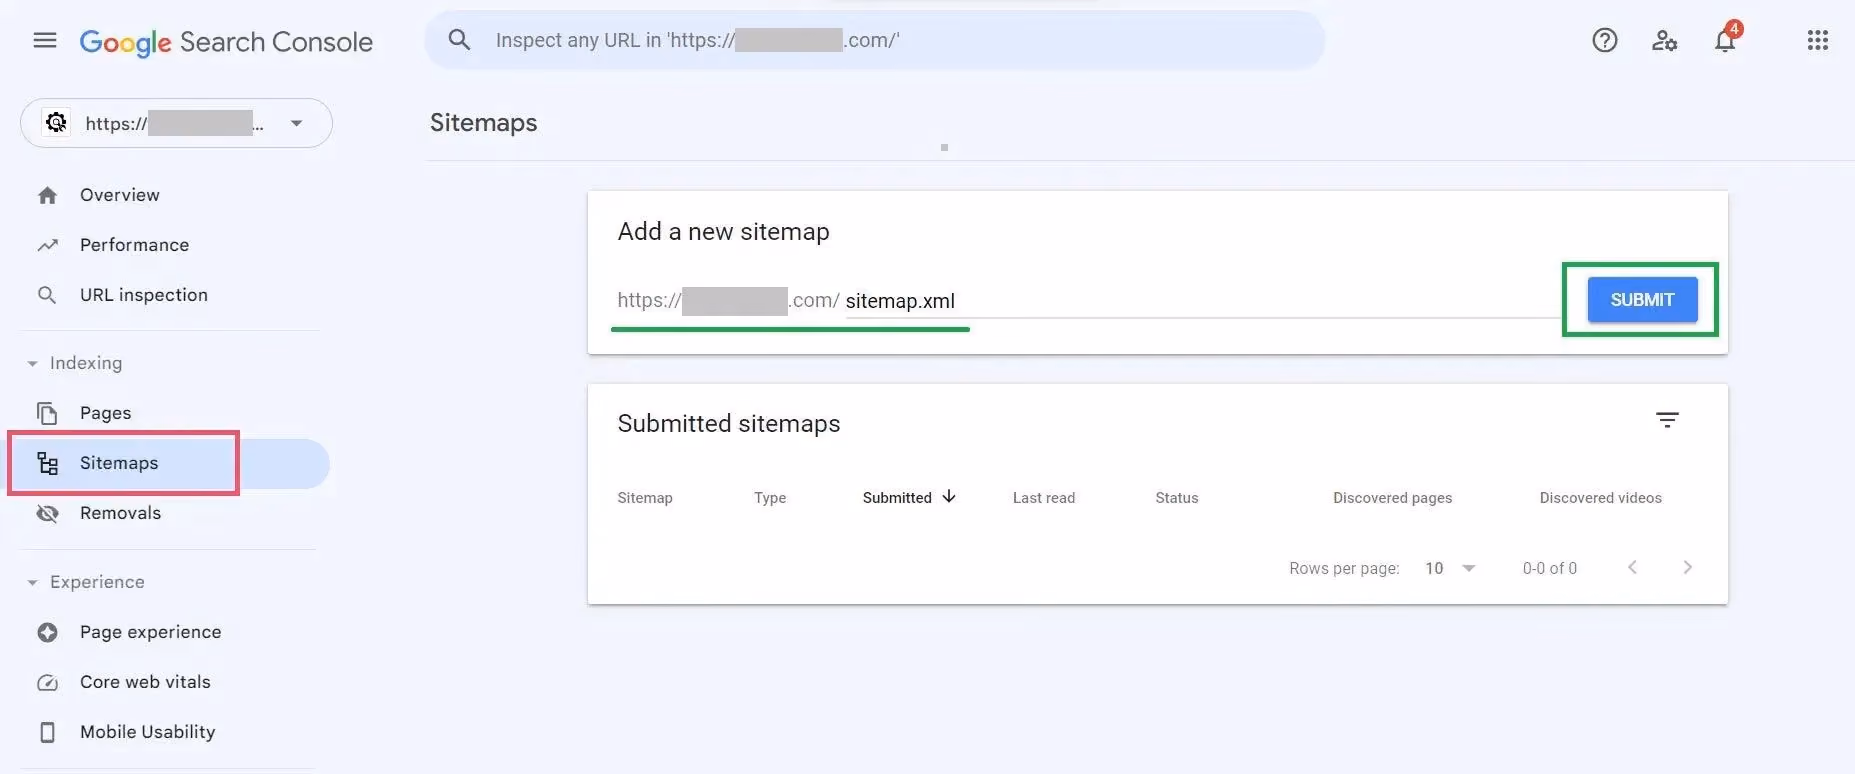
Sitemap and Search Console
Shopify automatically generates a sitemap at yourstore.myshopify.com/sitemap.xml. Once your domain is connected in step 8, submit this sitemap to Google Search Console under Index > Sitemaps. Also monitor Search Console for any crawl errors or 404s that appear after launch catching these early prevents ranking drops.
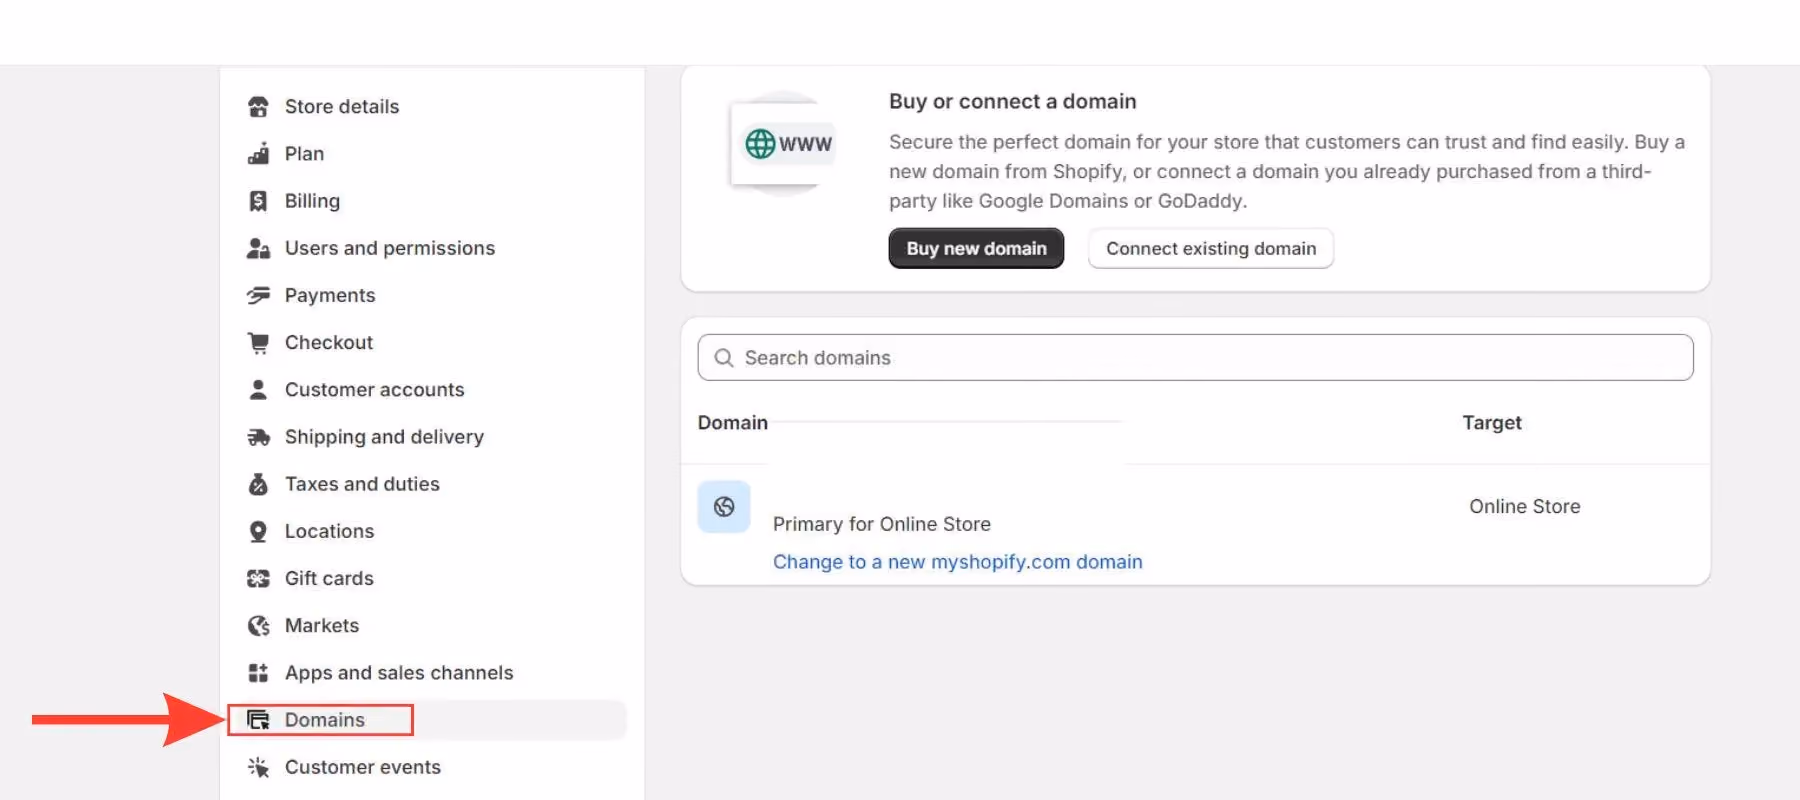
Step 8: Connect Your Domain and Go Live
With everything tested and verified, connect your existing domain to Shopify. Go to Shopify Admin > Settings > Domains > Add existing domain, enter your domain name, and Shopify will show you the DNS records to update.
Updating DNS Records
At your domain registrar (GoDaddy, Namecheap, Cloudflare, etc.), update two records. The A record should point to Shopify's IP address, which is provided in Shopify Admin.
The CNAME record should point www to shops.myshopify.com. DNS propagation takes up to 48 hours. During this window, keep your WordPress site live. Do not cancel WordPress hosting until you have confirmed Shopify is fully operational and indexed.
For .ae domains in the UAE, DNS is typically managed through your registrar (DU, Etisalat or GoDaddy UAE). Ensure your UAE Trade License is on file with your domain provider, as .ae domains require it.
Post-Migration Checklist: What to Do After Going Live
Going live is not the finish line. There are several checks that must happen in the first 48 hours to catch problems before they compound.
Testing Redirects and Checkout
Use httpstatus.io to verify every redirect returns a 301 response, not a 302 or 404. Then place a test order, going through the full checkout with a real payment method.
If you are in the UAE, specifically test Telr or PayTabs since these are not Shopify-native integrations and occasionally require additional configuration.

Verifying Analytics and Tracking
Confirm that Google Analytics / GA4 is recording events and pageviews correctly. Use the Meta Pixel Helper Chrome extension to verify that your Meta Pixel fires on product pages and at checkout.
Gaps in tracking here mean you will lose attribution data on paid campaigns running during the launch period.
Monitoring Search Console and Page Speed
Check Google Search Console 24 to 48 hours after launch and look for crawl errors and 404s. Address any that appear immediately.
Run your homepage and top product pages through Google PageSpeed Insights your new Shopify theme should score noticeably better than your WordPress setup did, but confirm this rather than assuming.
Cleaning Up Old Links and Hosting
Go through your blog posts and update any internal links that still point to old WordPress URLs. These will redirect correctly, but updating them avoids depending on redirects indefinitely.
Finally, cancel your WordPress hosting only after 90 days, and keep your backups until then. Moving too quickly on this step is one of the most common post-migration mistakes.
How Long Does WordPress to Shopify Migration Take?
Timeline depends almost entirely on the volume and complexity of your data. A small store with under 100 products can be migrated in 1 to 3 days. A medium store with 100 to 1,000 products typically takes 1 to 2 weeks.
A large store with 1,000 or more products and a complex setup runs 3 to 6 weeks, usually with agency involvement.
These timelines assume you are doing the work yourself or with one developer. Agency-led projects can run faster if there is a larger team, but they also include quality checks, redirect auditing, and post-launch monitoring that add legitimate time.
How Much Does It Cost to Migrate from WordPress to Shopify?
Migration cost breaks down into two parts: the one-time migration cost and the ongoing Shopify plan cost.
Doing it yourself with free tools costs nothing beyond your Shopify plan, which starts at $39/month on the Basic plan.
Using Matrixify adds from $20/month on top of that.
Cart2Cart charges from around $29 per migration. Hiring a global agency typically runs $500 to $5,000 depending on store complexity, while a UAE-based agency will generally quote AED 3,000 to AED 20,000 for GCC stores requiring Arabic content and regional compliance work.
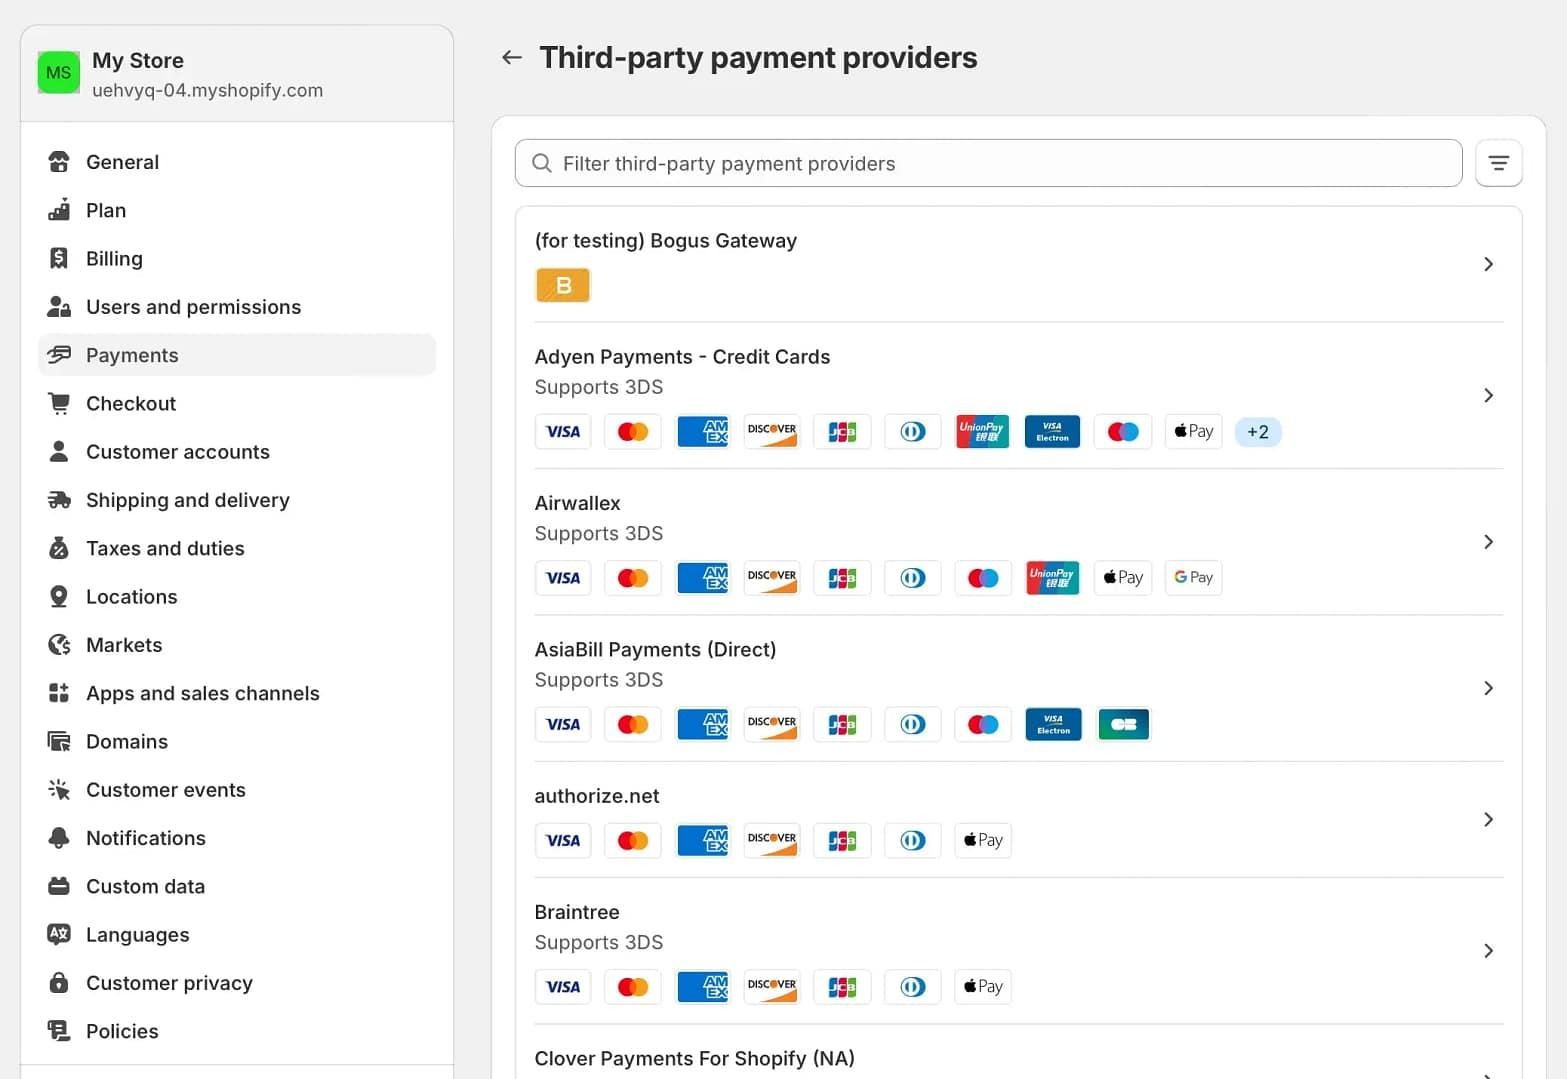
One important note for UAE stores: Shopify Payments is not yet available in the UAE, which means you cannot use Shopify's built-in payment processor.
Instead, you need to connect a third-party gateway such as Telr, PayTabs, Amazon Payment Services, or Network International.
With these gateways, Shopify charges a transaction fee typically 0.5% to 2% depending on your plan which reduces to 0.15% on Shopify Plus.
WordPress to Shopify Migration: Common Mistakes to Avoid
If something breaks during import, you have no recovery point. This is the most basic safety step and the one most likely to be skipped under time pressure. Do not skip it.
Not Setting Up 301 Redirects
This is the single largest cause of traffic loss after migration. Every URL that changes without a redirect drops in Google. The redirects step is not optional; it is what protects the SEO equity you have built over years.
Forgetting to Migrate Blog Post Images
Images embedded in post content often do not transfer with the text. They need to be re-uploaded and re-inserted manually.
If your blog is a significant traffic source, budget meaningful time for this.
Going Live Before Testing Checkout
Payment gateway issues discovered after launch cause real revenue loss. Run a full test order with a real card before pointing your domain to Shopify.
Cancelling WordPress Hosting Too Early
Keep it live until DNS has propagated, redirects are verified, and Shopify is confirmed working. Cancelling too early while DNS is still propagating can create a window of downtime.
Not Resubmitting the Sitemap to Google Search Console
Without this, Google continues indexing your old URLs longer than necessary. Submitting your new Shopify sitemap immediately after domain connection speeds up re-indexing significantly.
Ignoring Mobile on the New Theme
Your new Shopify theme may look different on mobile than your old WordPress theme did. Test it on multiple screen sizes before launch mobile accounts for the majority of ecommerce traffic in the GCC.
Migrating WordPress to Shopify in the UAE: What's Different
The UAE has specific platform requirements that most migration guides written for a global audience do not cover. If your store operates in the UAE or across the GCC, these details are not optional.
Payment Gateways
Shopify Payments is not available in the UAE, so you must integrate a third-party gateway. The most commonly used options are Telr, PayTabs, Amazon Payment Services and Network International.
Each has different setup requirements and transaction fees, so compare them before committing to one.
Arabic Language and RTL
Use a Shopify theme that supports RTL (right-to-left) layout natively. The Shopify Translate and Adapt app handles storefront translation into Arabic.
For product descriptions and collection pages, you will need to enter Arabic content manually or use a translation service; the app handles the interface, not the content itself.
VAT Compliance
UAE VAT is 5%, regulated by the Federal Tax Authority (FTA). In Shopify, configure your tax settings under Settings > Taxes and Duties. For automated VAT calculations and FTA-compliant invoices, use an app like Taxjar or Sufio.
Ensure every order generates a compliant tax invoice this is a legal requirement, not a best practice.
Shipping and Logistics
Integrate UAE-specific couriers through Shopify's shipping apps. The most commonly used providers are Aramex, DHL UAE and Fetchr, all of which offer integrations that give you real-time rate calculation and shipment tracking within Shopify.
Currency and Markets
Set AED as your primary currency. If you sell across the GCC, enable Shopify Markets to display prices in SAR (Saudi Arabia), KWD (Kuwait), BHD (Bahrain), QAR (Qatar), and OMR (Oman) with automatic conversion or fixed pricing per market.
Domain
.ae domains require a UAE Trade License for registration. Confirm with your registrar DU, Etisalat, or GoDaddy UAE that your license is on file and that the domain can be pointed to Shopify's servers without issues.
How Suplex Handles WordPress to Shopify Migrations
Suplex is a Dubai-based Shopify Partner that specializes in building and relaunching ecommerce stores across the UAE and GCC.
Migrations are one of the more demanding projects in ecommerce: data integrity, redirect mapping, SEO preservation and design all need to come together without disrupting live revenue. Suplex handles each of these as distinct workstreams rather than a single bulk task.
The Suplex migration process covers full WooCommerce data migration, custom Shopify theme design, redirect mapping and bulk upload, SEO metadata transfer, and Arabic localization for stores targeting UAE and broader GCC audiences.
Clients working across multiple GCC markets also get Shopify Markets configuration for multi-currency and regional pricing.
If you want a migration done without the risk of SEO drops or data loss, talk to our team.
FAQs
Is it easy to transfer from WordPress to Shopify?
It depends on your store's size and complexity. Small stores can migrate in 1 to 3 days using free tools like Shopify Store Importer or a CSV export.
Larger stores with thousands of products, customer records, and blog posts need a migration app like Matrixify or Cart2Cart, or a professional agency to avoid data loss and SEO damage.
Will I lose my SEO rankings when migrating from WordPress to Shopify?
Not if you set up 301 redirects correctly. Every old WordPress URL must redirect to the equivalent Shopify URL.
You should also re-enter meta titles, meta descriptions, and image alt text, and resubmit your updated XML sitemap to Google Search Console. Skipping redirects is the single biggest cause of traffic loss after migration.
Can I migrate WooCommerce orders and customer data to Shopify?
Yes. Tools like Matrixify and Cart2Cart can transfer WooCommerce products, customers, and order history to Shopify.
Note that customer passwords cannot be moved for security reasons. Customers will need to reset their password the first time they log in to your new Shopify store.
How much does it cost to migrate from WordPress to Shopify?
DIY migration using free tools costs nothing beyond your Shopify plan ($39/month for Basic). Migration apps like Cart2Cart start around $29 per migration, while Matrixify charges from $20/month. Hiring an agency typically costs $500 to $5,000 depending on store size. In the UAE, expect agency fees from AED 3,000 to AED 20,000.
Can I migrate my WordPress blog posts to Shopify?
Yes. Blog posts can be migrated using Matrixify's WordPress importer or a similar tool. You export posts from WordPress as an XML file, then import them into Shopify's built-in blog.
Images embedded in posts often need to be re-uploaded manually, as they do not always transfer with the content.
Does Shopify support Arabic and RTL for UAE stores?
Yes. Shopify supports Arabic and right-to-left text natively on most modern themes. You can translate your storefront using the Shopify Translate and Adapt app.
For UAE stores, you also need to configure a compatible payment gateway, set AED as your primary currency, and ensure VAT settings comply with FTA requirements.
What happens to my WordPress domain when I move to Shopify?
Your domain stays yours. You point your domain's DNS records to Shopify's servers by updating the A record and CNAME in your domain registrar's settings.
Shopify provides step-by-step instructions for all major registrars. DNS propagation can take up to 48 hours. Keep your WordPress site live during this window to avoid any downtime.
Hi, I’m Rishabh Jain
I believe great design has the power to shape perception, build trust, and move businesses forward. That belief is what led me to found Suplex Design Studio, a global branding and packaging studio working with FMCG and D2C brands across markets.I started suplex at 25 with a clear intent, to create design that is strategic, thoughtful, and commercially meaningful. By 28, the studio had scaled globally, guided by a strong foundation in Integrated Design that I developed during my academic journey in London, where I was honoured with the Dean’s Award.
Over the years, I’ve had the opportunity to work with 100+ brands, from Fortune 500 organizations to family-run businesses, helping them build packaging and brand systems that create recall, relevance, and long-term value.
Suplex’s work has been recognized internationally, including the Manifest Award (2024), the Clutch Global Award (2025), and features on platforms such as Packaging of the World, The Dieline, and the World Brand Design Society.
None of this would be possible without the people behind the work. I’m deeply grateful to the suplex team, whose commitment, creativity, and attention to detail turn ideas into meaningful brand experiences every day.
At the heart of my work is a simple philosophy, design should be intentional, honest, and built to last, and that continues to guide everything we create at suplex.


Let’s Make It Happen
E-Commerce Success Stories

%201.avif)


.avif)

.avif)
Build Your D2C Business The Right Way
Build It With Suplex.


