Shopify Image Optimization: The Complete Guide to Faster Pages, Higher Rankings & More Sales
.avif)
Shopify Image Optimization: The Complete Guide to Faster Pages, Higher Rankings & More Sales
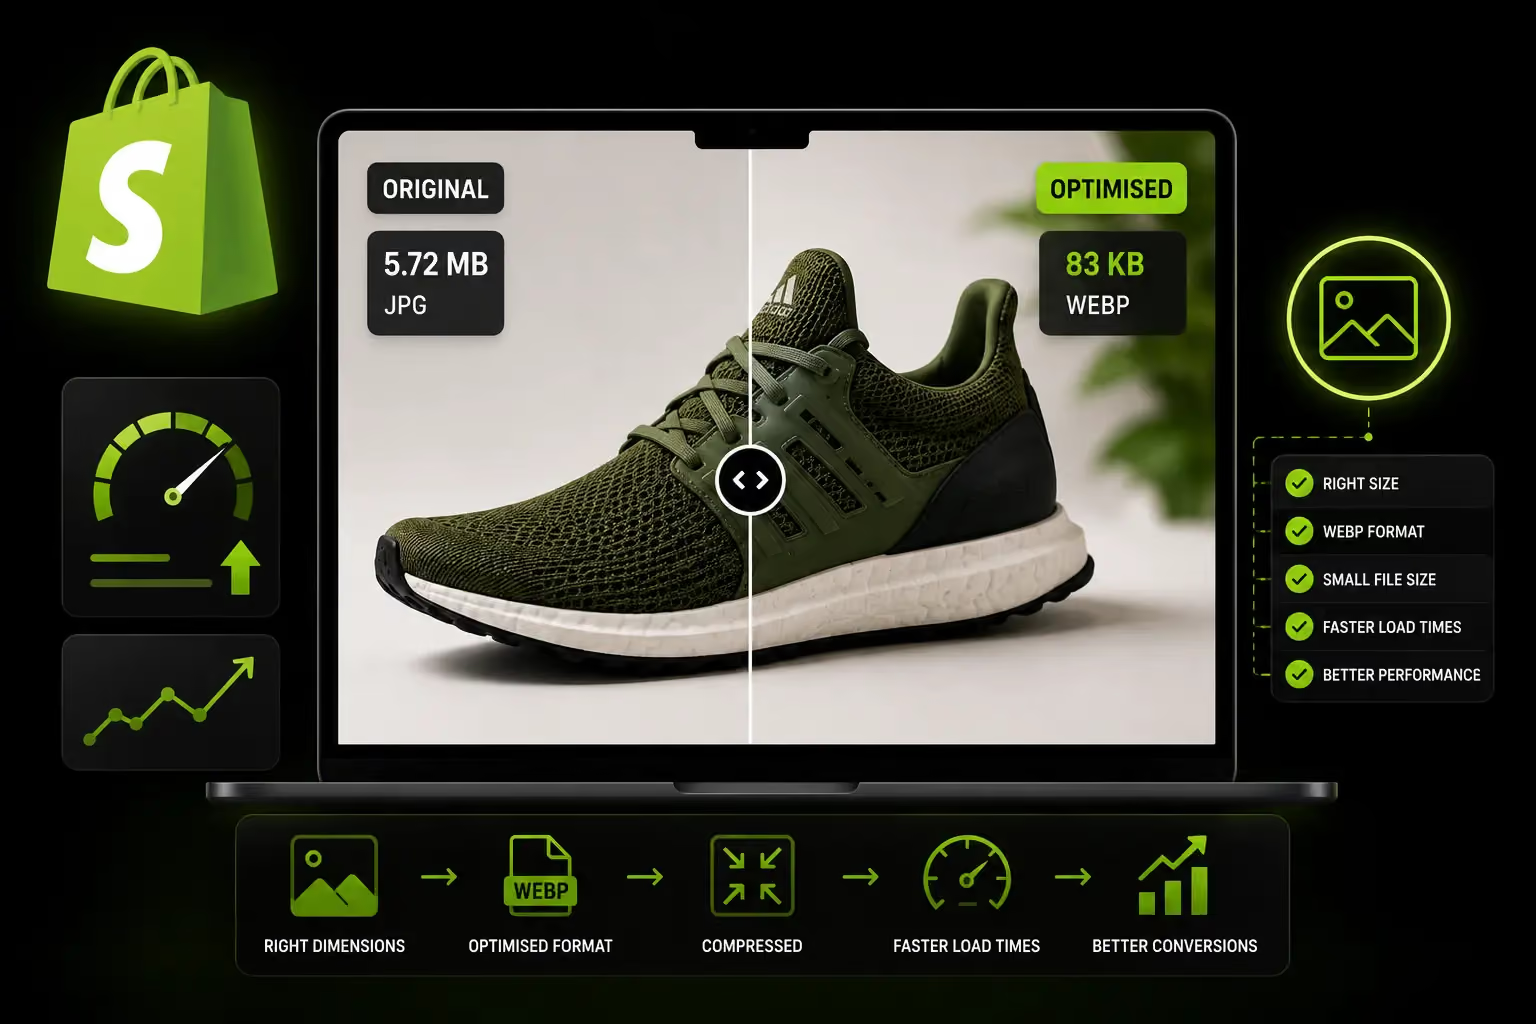
Shopify Image Optimization is the biggest performance lever on most ecommerce stores. Images typically make up 50–70% of total page weight, are a leading cause of LCP failures and are the first assets customers experience on a product page.
It directly affects revenue. A one-second delay in load time can reduce conversions by about 7%. On mobile, where most ecommerce traffic comes from, the impact is even greater due to variable network speeds.
This blog covers what Shopify handles automatically and what it does not, plus best practices for image dimensions, formats, compression, alt text, lazy loading, and Core Web Vitals, ending with a practical pre-launch checklist.
What Shopify Actually Does to Your Images (And What It Doesn't)
The most damaging misconception in Shopify performance optimization is that the platform handles images for you. It handles some things. The things it does not handle are the ones that cause the most damage to speed, rankings, and conversions.
What Shopify's CDN Does Automatically
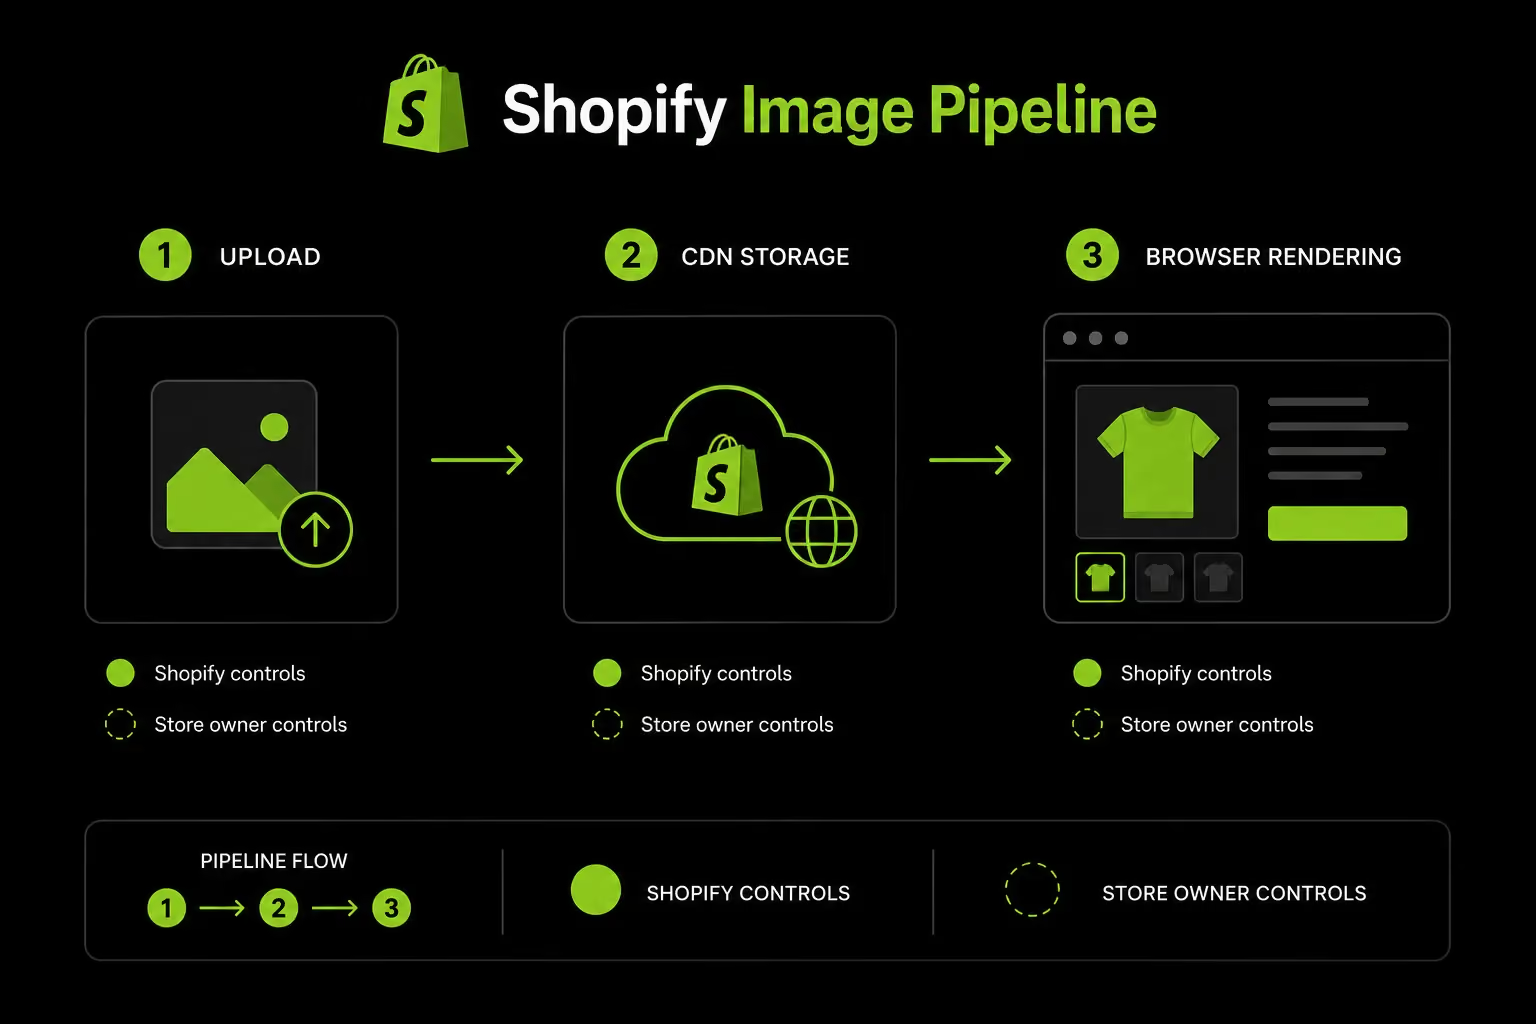
Shopify runs on Fastly's global CDN, which gives every store a fast, geographically distributed image delivery network. Within that infrastructure, Shopify does the following automatically:
- Serves images from the CDN node closest to the user reducing latency
- Applies compression on upload to reduce file size at delivery
- Supports on-the-fly resizing via URL parameters appending _800x.jpg to an image URL serves an 800px version without generating a separate file
- Converts images to WebP automatically when the browser supports it a feature Shopify has had since 2020
That last point deserves a specific note. Shopify's CDN WebP conversion is real and it works but only when images are served through Shopify's standard image URL pipeline.
If you upload a 5MB PNG and embed the raw storage URL directly in a custom section or theme edit, Shopify serves the original. The optimization is conditional on how the image is referenced, not unconditional at upload.
What Shopify Does NOT Do Automatically
This is the list that matters:
- Does not resize oversized uploads: If you upload a 4000×4000px image, Shopify stores that file at full resolution. It will serve a smaller version via URL parameters but only if your theme is written to request one. Many themes are not.
- Does not write or generate alt text: Every image in your store is blank until you fill it in.
- Does not choose the right format at upload: Upload a PNG photograph, Shopify stores a PNG photograph.
- Does not optimize above-the-fold images for LCP priority: It does not add fetchpriority="high" to your hero or main product image.
- Does not remove EXIF metadata: from image files, camera settings, GPS data, and colour profiles that inflate file size without adding anything the browser uses.
- Does not generate image sitemaps: to help Google discover and index your product imagery.
- Does not apply lazy loading correctly everywhere: and critically, applying it in the wrong place is a common theme-level mistake that actively hurts performance.
Why Image Optimization Directly Affects Revenue, Not Just Speed
Speed metrics are a means to an end. The end is revenue. This section makes the business case directly because image optimization decisions are ultimately budget and priority decisions.
Images Are the Primary Driver of LCP Failures on Shopify
LCP Largest Contentful Paint measures how long it takes the largest visible element on a page to render.
It is a confirmed Google ranking factor and the Core Web Vital that most Shopify stores fail on. On a typical product page, the LCP element is the main product image. On a homepage, it is almost always the hero banner.
A good LCP score is under 2.5 seconds. Most unoptimized Shopify stores score between 3.5 and 6 seconds on mobile.
The cause, in the majority of cases, is a product image or banner that was uploaded at full resolution, has not been compressed, and is being loaded without priority signalling to the browser.
Google's own research is direct on the consequences: as page load time increases from 1 second to 3 seconds, the probability of a mobile user bouncing rises by 32%.
From 1 second to 5 seconds, that figure is 90%. Your LCP score is not a technical metric. It is a measure of how many people leave before your product image has finished loading.
The Conversion Cost of Slow Product Images
Page speed affects bounce rate. Product image load speed affects add-to-cart rate. These are different problems with the same root cause.
A shopper who waits more than 3 seconds for a product image to render on mobile has already formed a negative impression of the brand regardless of product quality or price.
In the UAE and Gulf market, where mobile penetration is among the highest in the world and users frequently browse on 4G rather than Wi-Fi, unoptimized images create a disproportionate conversion penalty.
The customer does not think "this image is slow." They think "this store is slow." That association affects purchase intent.
Image Quality vs. Image Weight: The False Trade-Off
Compressing images will not make your products look worse at normal viewing sizes. This is the most persistent myth in ecommerce image management, and it is costing stores money.
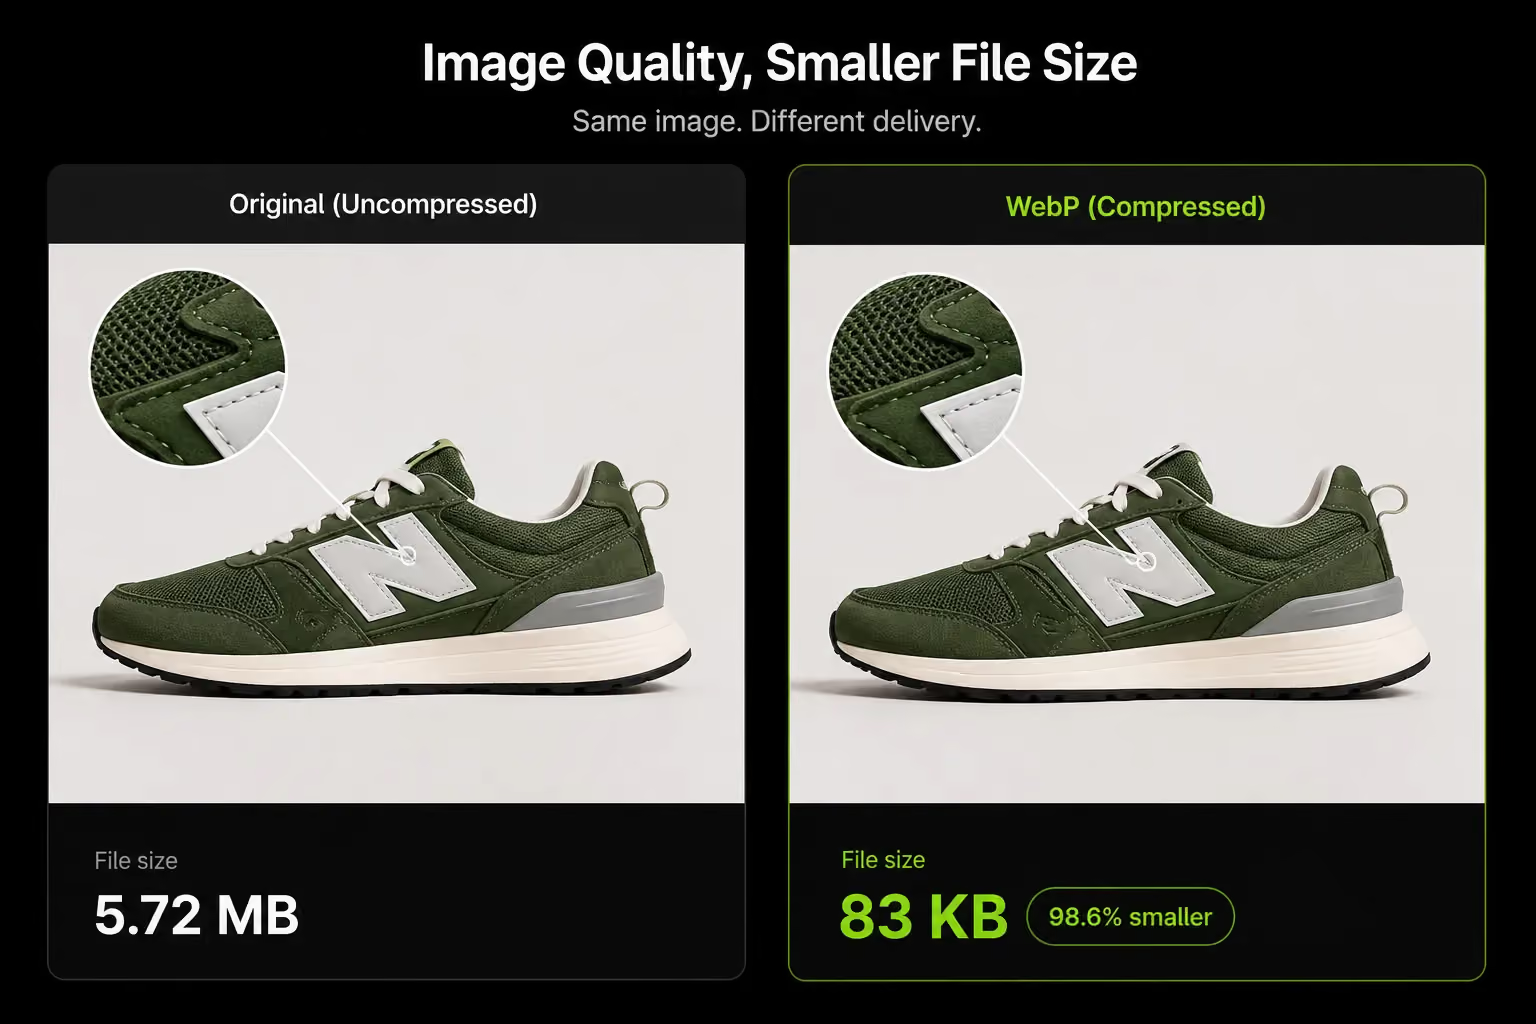
Modern compression WebP or JPEG at 75 – 80% quality is visually indistinguishable from the original to the human eye at typical product image viewing sizes.
An 80KB WebP and a 5MB PNG of the same product, displayed at 600px wide on a product page, look identical. One contributes to a fast, converting page. The other does not.
When we audit Shopify stores at Suplex, the most common mistake is finding raw studio files uploaded directly to the product catalog 6MB TIFFs or uncompressed PNGs straight from a photographer's delivery folder.
A 6MB file does not serve the customer. At viewing size, the compression loss is invisible. The speed loss is not.
Shopify Image Sizes: The Right Dimensions for Every Page Type
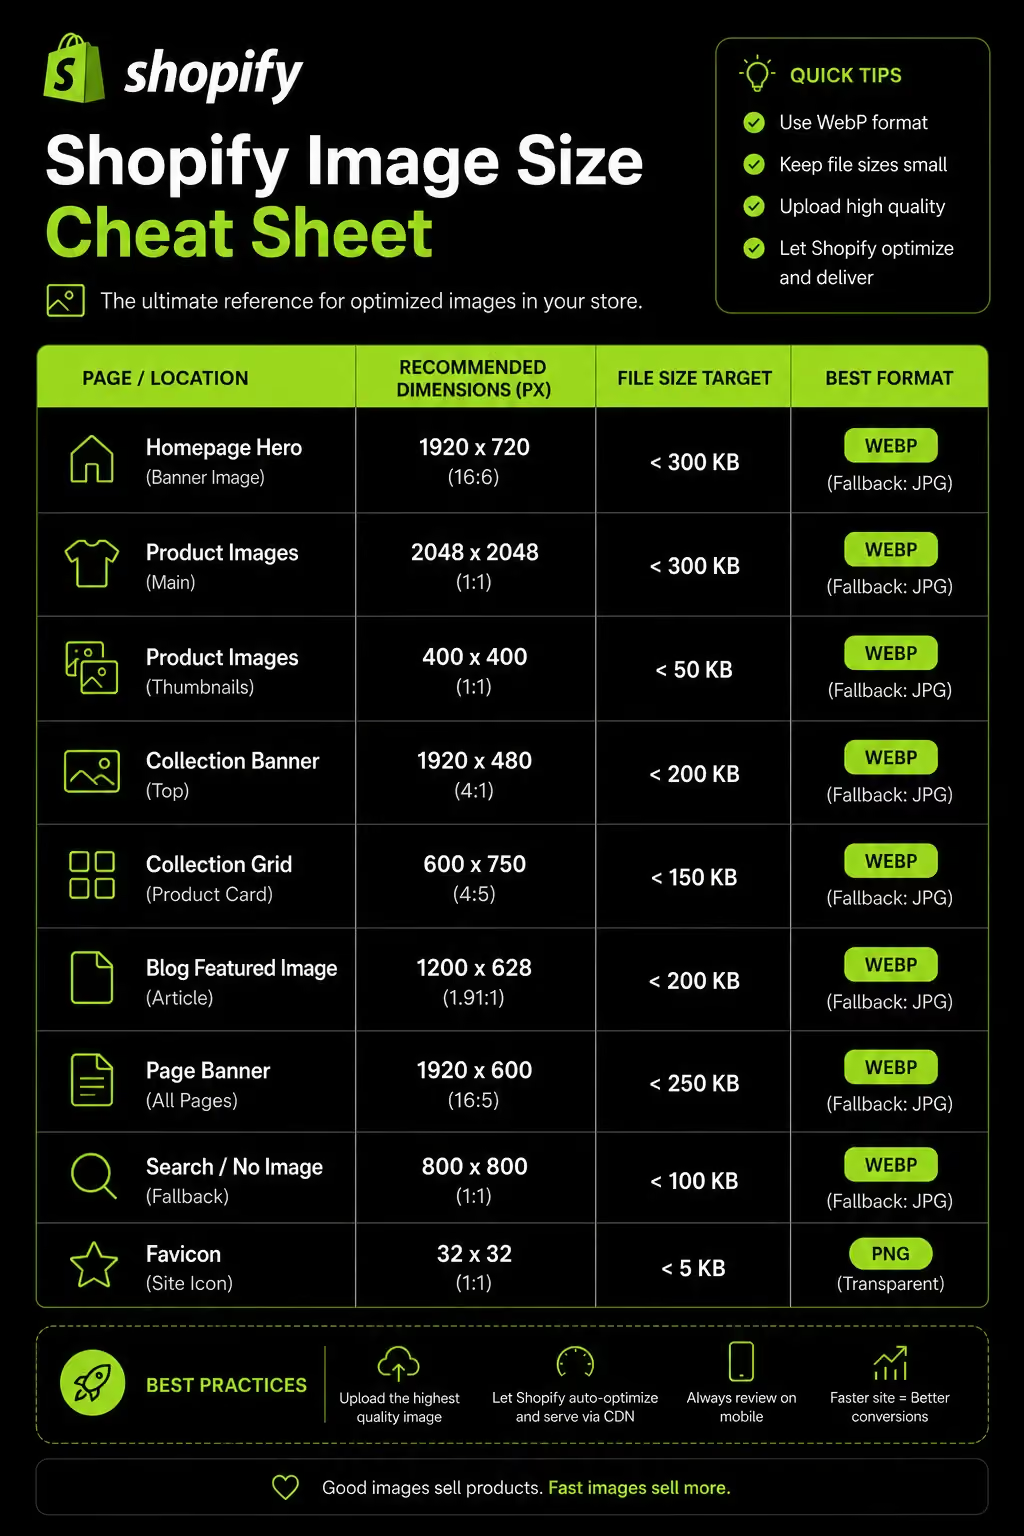
Most guides give a single recommended dimension for all Shopify images. That is not how Shopify actually renders images. A product page hero behaves differently from a collection thumbnail and a hero banner has different requirements from a blog image. Use the right dimensions for the right context.
Product Images
Product images are the most important images in your store. They are the LCP element, they drive add-to-cart decisions, and they are what Google indexes for Shopping.
- Recommended upload size: 2048×2048px in a 1:1 square ratio
- Shopify's maximum: 5000×5000px at 20MB do not upload at this size; it is a ceiling, not a target
- File size target: under 200KB after compression; under 100KB for secondary and variant images
- Format: WebP preferred; JPEG for photography; PNG only for images requiring transparency
- Why square: Shopify themes render product images in square or near-square containers. Landscape or portrait images will be cropped, padded or distorted inconsistently depending on the theme. Square uploads give you predictable, consistent rendering across all themes and devices.
Collection Page Images
Collection thumbnails render small, typically 300 – 500px on screen and load 6 to 12 at once on a category page. File weight multiplies fast here.
- Recommended size: 800×800px or 1200×1200px
- File size target: under 80KB per image
Note: High resolution is wasted on collection thumbnails. A 2048px image scaled down to 300px display size delivers no visible benefit and costs multiple times the bandwidth.
Hero Banners and Homepage Images
Hero banners are the LCP element on most homepages. They need careful size management and must be handled differently from product images.
- Desktop: 1800×600px to 2000×800px (landscape)
- Mobile: Where your theme supports separate mobile images, use a dedicated version portrait-cropped, under 150KB
- File size target: under 300KB for desktop; under 150KB for mobile
- Critical: Hero images must be preloaded, not lazy-loaded. They are above the fold and need to be the browser's first priority. This is covered in detail in the lazy loading section.
Blog and Content Images
Blog images sit inside a content column and rarely need to be wider than the column itself.
- Width: Match your content column typically 700 – 1200px
- File size target: under 150KB
- Note: Shopify's compression for blog images is less aggressive than for product images. Always compress before uploading.
Logos and Icon Files
- Format: SVG is the correct choice infinitely scalable, negligible file size, no quality loss at any resolution
- PNG fallback: Keep under 20KB
- Avoid JPEG for logos entirely: Lossy JPEG compression creates visible artifacts on sharp edges and text, which are exactly what logos contain.
Image File Formats on Shopify: JPEG, PNG, WebP, AVIF
Format selection is a decision most store owners make by default they upload whatever file format the photographer delivered. That default is costing page speed. Here is when to use each format and why.
JPEG: The Default for Product Photography
JPEG is the right format for the majority of ecommerce product images, anything involving photographs, lifestyle imagery, or images with complex colour gradients.
- Compression type: Lossy some data is discarded on each save
- Sweet spot: 75 – 80% quality setting removes 60 – 70% of file weight with no visible quality loss at normal viewing sizes
- Limitation: No transparency support for images that need a transparent background, use PNG or WebP
- Best for: All standard product photography, lifestyle shots, editorial images
PNG: Use Only When You Need Transparency
PNG files are large. For photographs, they are typically 3 – 5 times the size of an equivalent JPEG. The only reason to use PNG is transparency.
- Compression type: Lossless no quality loss
- Use for: Logos, product images on white or transparent backgrounds, images containing text overlays
- Common mistake: Uploading product photography as PNG "for quality." This adds significant file weight with zero visible benefit and directly damages your page speed scores.
WebP: The Format Shopify Now Supports
WebP is the format to use wherever possible. It delivers 25 – 35% smaller file sizes than JPEG at equivalent visual quality and supports both transparency and animation making it a strict upgrade in most scenarios.
- Shopify converts uploaded JPEG and PNG files to WebP automatically for supported browsers this covers all modern browsers
- Uploading WebP directly is supported, but verify your theme handles it before running a bulk conversion
- The practical recommendation: upload high-quality JPEG source files and let Shopify's CDN serve WebP to supported browsers. You get the benefits of WebP without managing format compatibility yourself.
AVIF: Watch, Don't Adopt Yet
AVIF is the next-generation format 50% smaller than JPEG, better quality than WebP at equivalent compression.
Browser support is strong in Chrome, Firefox and Safari (2022+), but Shopify's CDN pipeline does not yet natively convert to AVIF. It is worth monitoring, but not ready for primary use on Shopify stores today.
GIF: Avoid for Ecommerce
GIF files are large, limited to 256 colours, and a poor choice for any ecommerce use. For product animations or 360-degree views, use an MP4 video with autoplay and loop attributes instead.
An MP4 of equivalent length and quality is typically 5 – 10 times smaller than a GIF.
Shopify Image Compression: How to Do It Right Before Upload
Compressing images before uploading is not optional for stores with more than a handful of products. Shopify stores your original uploaded file at full size.
The CDN serves optimized versions but your upload time, processing overhead, and original storage all reflect what you uploaded.
For stores with 500+ products, an unmanaged upload process creates a catalog of oversized source files that degrade performance at every layer.
Why You Should Compress Before Upload
Shopify's compression at CDN delivery is real but conditional. The original file you upload sits in Shopify's storage exactly as you sent it.
If your theme requests a resized version via URL parameters, Shopify serves the smaller version. If it does not and many themes do not handle this correctly for every image type your original oversized file is what the browser receives.
Pre-upload compression is a baseline requirement, not an optimization extra.
Manual Compression Tools (No App Required)
For teams managing their own image workflow before catalog upload:
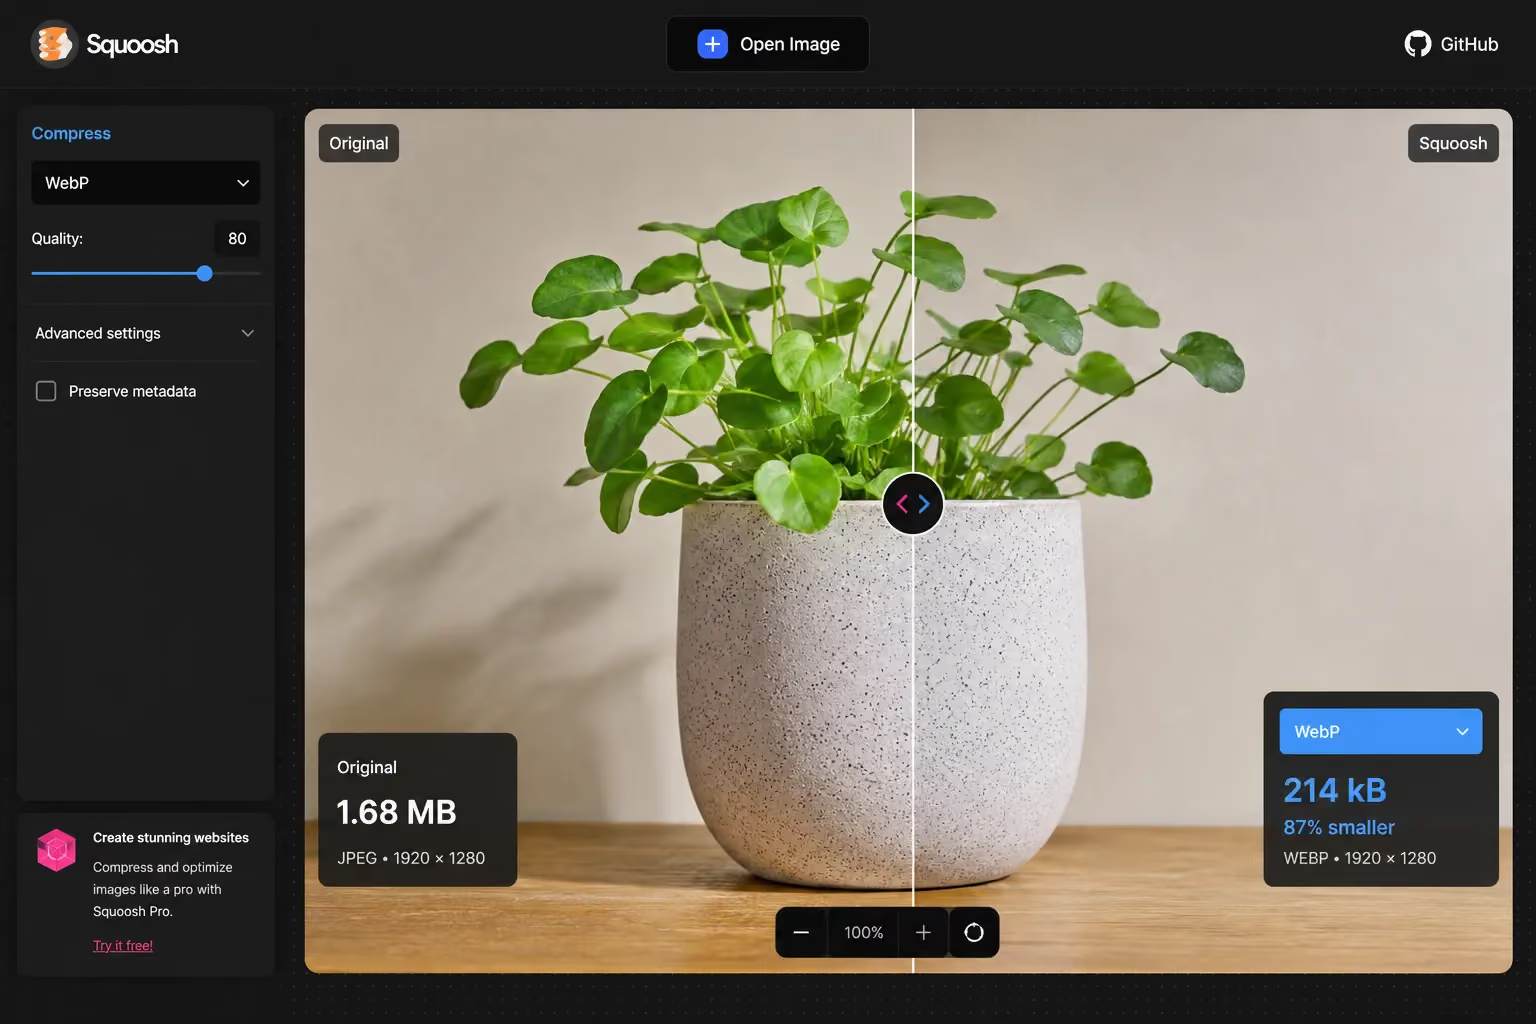
- Squoosh (squoosh.app): Google's free browser-based tool. Best for precision you choose format, quality setting, and see file size and visual output side by side before saving. The best tool for understanding what compression actually does.
- TinyPNG / TinyJPG: Simple batch compression. Free up to 20 images per month. Suitable for small catalogs or teams new to image optimization.
- ImageOptim (Mac): Desktop drag-and-drop tool that processes multiple files simultaneously. Supports both lossless and lossy modes.
- Photoshop Export for Web: The most control. Use "Save for Web" with a quality setting of 75 – 80% for JPEG. The professional standard for photography-heavy catalogs.
Shopify Apps for Bulk and Automated Compression
Manual compression is not practical at scale. For stores with 500+ products or active new-product workflows, an app handles compression automatically on upload.
Apps worth evaluating: TinyIMG, Crush.pics, Booster SEO. When assessing any compression app, look for:
- Bulk processing with original image backup before compression
- Automatic alt text generation or suggestion
- WebP conversion option
- Configurable compression quality settings
One important caution: some apps use aggressive compression settings that visibly degrade high-end product photography, particularly textured fabrics, jewellery detail and food imagery.
Always run a test batch of 10 – 20 images and review at 100% zoom before triggering a bulk compression run across your entire catalog. An aggressive setting that saves 20KB per image is not worth it if it makes your products look cheap.
The Compression Settings That Actually Work
- JPEG: 75 – 82% quality. Above 82%, the file size savings become marginal. Below 70%, visible artifacts appear on product detail and fine texture.
- PNG: Use palette-based compression via pngquant or Squoosh. This can reduce PNG file sizes by 60 – 80% without visible quality loss.
- Targets to hit: Product images under 200KB, collection thumbnails under 80KB, hero banners under 300KB for desktop.
Alt Text for Shopify Images: SEO, Accessibility and Getting It Right
Alt text is one of the most consistently neglected image optimization tasks on Shopify stores, and it is entirely invisible to Shopify's CDN.
The platform does nothing to generate, suggest, or populate it. Every image on your store has blank alt text unless you fill it in manually or use an app to assist at scale.
What Alt Text Does (And Does Not Do)
Alt text tells search engines what an image depicts. It is used by Google for Image Search rankings, by Google Shopping for product image indexing, and by screen readers for visually impaired users. It also displays as fallback text when an image fails to load which happens more often on mobile on poor connections than most store owners expect.
What alt text does not need to be: keyword-stuffed. Filling alt text with "buy cheap red sneakers Dubai UAE online" is a signal Google treats as spam. Descriptive and accurate is the goal.
How to Write Alt Text That Actually Ranks
A simple formula works for most product images:
[Product Name] + [Key Attribute] + [Context if Relevant]
- Avoid: img123.jpg, product, photo, image1
- Avoid: buy cheap red trainers Dubai UAE best price online
- Use: Nike Air Max 90 in Infrared Red Men's Running Shoe
- Use: Hand-poured soy candle in amber glass jar Sandalwood and Vanilla
- For lifestyle images: Describe scene and product together Woman applying matte lipstick in desert sand shade against warm-toned background
Google Lens and AI-powered visual search are growing fast. Alt text and descriptive file names are becoming more important as image-based search matures.
This is an emerging ranking signal most Shopify store owners have not acted on.
How to Add Alt Text in Shopify
In Shopify admin: Product page → click the image → click "Edit alt text" → enter your description → save.
For stores with more than 50 – 100 products, doing this manually page by page is not realistic.
Apps including TinyIMG and Booster SEO offer bulk alt text management either AI-generated suggestions you approve or rule-based templates you define.
File Names Matter Too
Shopify generates image URLs from the file name at upload. A file named IMG_8471.jpg creates a URL with that string embedded.
A file named red-maxi-dress-womens-summer.jpg creates a URL that is descriptive, readable by search engines, and an additional SEO signal.
Rename image files before uploading. Use hyphens as word separators not underscores. Google reads hyphens as word breaks. It does not treat underscores the same way.
Lazy Loading on Shopify: What It Is, Where to Use It, and Where Not To
Lazy loading is one of the most misunderstood performance tactics in Shopify optimization. Applied correctly, it measurably improves page load time.
Applied in the wrong place which is extremely common it directly causes LCP failures and hurts Google rankings.
What Lazy Loading Does
Lazy loading delays the loading of images that are outside the user's visible viewport until they scroll to them.
The browser only fetches these images when they are about to enter the screen. This reduces the number of network requests made on initial page load and improves perceived performance for long pages.
Modern browsers support lazy loading natively via the loading="lazy" attribute on <img> tags with no JavaScript library required.
How Shopify Handles Lazy Loading
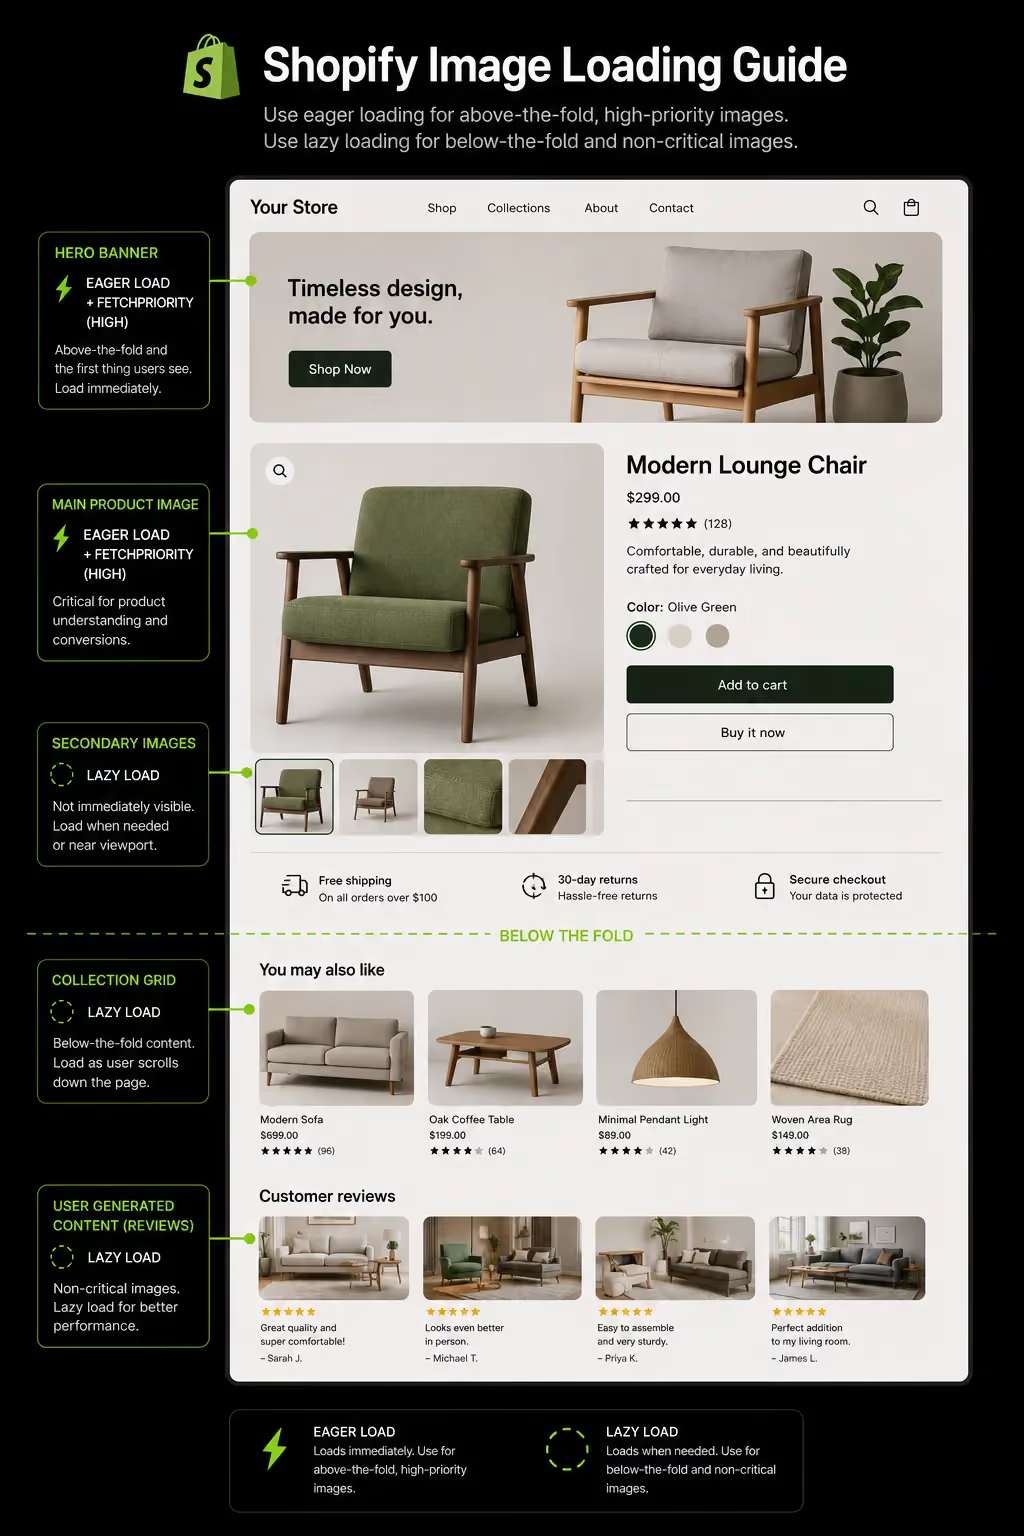
Shopify's Dawn theme and most modern Shopify themes implement lazy loading by default on product grid images and collection page thumbnails. This is correct behaviour: images below the fold on a collection page should load on demand, not all at once.
The Critical Mistake: Lazy Loading Hero and Product Images
Images above the fold must never be lazy-loaded. This includes:
- The main product image on a product page
- The hero banner on the homepage
- Any feature image in the first visible viewport on any page
Applying loading="lazy" to these images delays LCP. The browser encounters the lazy attribute and deprioritizes fetching the image which is exactly the opposite of what you need for your most visible, most critical element.
This is the single most counterintuitive error we find in Shopify theme audits at Suplex. Stores add lazy loading globally, believing it helps speed across the board.
Instead, it causes their LCP failures. The fix is surgical: ensure your main product image and hero banner use loading="eager" or fetchpriority="high". This tells the browser to treat these images as a priority resource.
Core Web Vitals and Shopify Images: The Connection Most Stores Miss
Core Web Vitals are Google's framework for measuring real-world page experience. Images are the primary driver of failures across all three metrics on Shopify stores yet most ecommerce guides treat Core Web Vitals as a separate topic from image optimization. They are the same topic.
What Core Web Vitals Actually Measures
LCP (Largest Contentful Paint): Time to render the largest visible element. On a Shopify product page, this is almost always the main product image. Good: under 2.5 seconds.
Needs improvement: 2.5 – 4 seconds. Poor: above 4 seconds. Most unoptimized Shopify stores on mobile sit in the "poor" range.
CLS (Cumulative Layout Shift): Measures how much the page visually shifts as elements load. When images load without specified width and height attributes, the browser does not reserve space for them.
The page renders, then jumps when the image loads. Every jump is a CLS score increase and a usability problem that affects how users interact with CTAs.
INP (Interaction to Next Paint): Measures responsiveness to user input. Heavy image rendering contributes to INP degradation on image-heavy pages, particularly on mobile.
How to Fix LCP on Shopify Product Pages
Follow this sequence:
- Open Google PageSpeed Insights and run your top product page URL
- Identify the LCP element it will be labelled in the report
- If it is your product image, compress it to under 200KB in WebP or JPEG format
- Confirm it is not being lazy-loaded check your theme's Liquid files for loading="lazy" on the featured product image
- Add fetchpriority="high" to the main product image element this requires a theme code edit or a developer
- Confirm your theme is serving the image via Shopify's URL parameters at the correct display size not serving the original 2048px file where a 600px version is needed
How to Fix CLS Caused by Images
Add explicit width and height attributes to every <img> tag in your theme. Without them, the browser has no way to reserve the correct space before the image loads and the layout shifts when it arrives.
Check your theme's Liquid template files; modern Shopify themes typically handle this correctly, but legacy or heavily modified themes often do not.
How We Approach Image Optimization for Shopify Stores at Suplex
Image optimization is never an afterthought in a Suplex project. It is typically the highest-leverage intervention we make.
A store with strong UX, a well-designed product page, and a compelling offer but 4-second product image load times on mobile is leaving a significant share of its potential revenue untouched.
The approach follows a consistent sequence that prioritizes by impact, not volume.
Step 1: Image Audit First
Before compressing anything, we establish a baseline: current image sizes and formats across all page types, LCP scores on the homepage and top product pages, and mobile performance at 4G speeds typical of the UAE and Gulf market.
This tells us where the actual losses are. Not every store has the same problem, some have hero banner issues, some have collection page bloat, some have product images that are fine but theme-level lazy loading misapplication destroying LCP.
Step 2: Prioritize by Revenue Impact
We fix product images before collection thumbnails. We fix homepage hero banners before blog images. The pages generating the most conversion value get addressed first.
A 500-product catalog should not be optimized uniformly by traffic volume and conversion rate, starting with the pages where a performance improvement has the most direct revenue impact.
Step 3: Format Audit and Code-Level Fixes
We verify that the theme is correctly serving WebP through Shopify's CDN pipeline. We add fetchpriority="high" to featured product images in the theme's Liquid files.
We audit the theme for lazy loading misapplication. It is the first code-level check in every Shopify performance audit we run. We set explicit width and height on all image elements to eliminate CLS.
Step 4: Automate What Makes Sense, Manual What Matters
We configure automated compression for new product uploads where the catalog workflow supports it. But hero banners, campaign imagery, and brand lifestyle photography get reviewed manually before publishing.
These images represent the brand. A bulk compression app with an aggressive quality setting should not have final say over what defines your brand's visual identity.
Shopify Image Optimization Checklist: What to Do Before You Launch
Every product image should pass this checklist before it goes live. Use it as a pre-publish gate not a post-launch remediation task.
Frequently Asked Questions
Does Shopify automatically optimize images?
Shopify compresses images at the CDN level and converts them to WebP for supported browsers. But it does not resize oversized uploads, generate alt text, or choose the right format for you.
You still need to compress and resize before uploading, name files descriptively, and write alt text manually. Shopify's automation reduces the problem and does not eliminate the need for a proper optimization workflow.
What image size should I use for Shopify product pages?
Upload product images at 2048×2048px in a 1:1 square ratio. This gives Shopify enough resolution for zoomed views without uploading unnecessarily large files.
After compression, product images should be under 200KB. For collection page thumbnails, 800×800px is sufficient; they render small and do not benefit from higher resolution.
Is JPEG or PNG better for Shopify?
JPEG is better for product photography. It compresses efficiently and handles most ecommerce use cases well.
Use PNG only when you need transparency logos, product images on non-white or transparent backgrounds. PNG files are typically 3 – 5 times larger than JPEG for the same photograph. When possible, upload JPEG and let Shopify's CDN deliver WebP automatically to modern browsers.
Why are my Shopify images blurry?
Shopify applies compression during CDN delivery, which can soften detail on images that were already compressed before upload. To prevent this: upload high-resolution source files (minimum 1024px on the shortest side), avoid compressing JPEG files multiple times before uploading, and use a quality setting of 80% or above when pre-compressing.
The higher the quality of the file you upload, the better Shopify's compression output will be.
What is lazy loading and should I use it on Shopify?
Lazy loading delays the loading of images outside the user's visible viewport until they scroll to them, reducing initial page load time. Use it for product grid images, collection thumbnails, and any image below the fold.
Never apply it to your hero banner or main product image. These elements are above the fold and need to load immediately; lazy loading them will damage your LCP score and directly hurt Google rankings.
How do images affect Shopify's Core Web Vitals score?
Images are the primary cause of LCP failures on Shopify, the most heavily weighted Core Web Vital. Oversized or uncompressed product images delay LCP.
Missing width and height attributes cause CLS (layout shift). Lazy loading of hero images worsens LCP. Fixing these three issues consistently has the largest impact on Core Web Vitals scores and the organic rankings tied to them.
How many images should a Shopify product page have?
Five to eight images per product listing covers most ecommerce categories effectively: one clean hero shot on white, two to three detail or closeup shots, one to two lifestyle images, and optionally a scale reference.
Beyond eight images, diminishing returns set in and page load time increases. Optimising every image in the set weight multiplies quickly on mobile where network conditions are already a constraint.
Hi, I’m Rishabh Jain
I believe great design has the power to shape perception, build trust, and move businesses forward. That belief is what led me to found Suplex Design Studio, a global branding and packaging studio working with FMCG and D2C brands across markets.I started suplex at 25 with a clear intent, to create design that is strategic, thoughtful, and commercially meaningful. By 28, the studio had scaled globally, guided by a strong foundation in Integrated Design that I developed during my academic journey in London, where I was honoured with the Dean’s Award.
Over the years, I’ve had the opportunity to work with 100+ brands, from Fortune 500 organizations to family-run businesses, helping them build packaging and brand systems that create recall, relevance, and long-term value.
Suplex’s work has been recognized internationally, including the Manifest Award (2024), the Clutch Global Award (2025), and features on platforms such as Packaging of the World, The Dieline, and the World Brand Design Society.
None of this would be possible without the people behind the work. I’m deeply grateful to the suplex team, whose commitment, creativity, and attention to detail turn ideas into meaningful brand experiences every day.
At the heart of my work is a simple philosophy, design should be intentional, honest, and built to last, and that continues to guide everything we create at suplex.























Let’s Make It Happen
E-Commerce Success Stories
%201.avif)






.avif)
.avif)
Build Your D2C Business The Right Way
Build It With Suplex.


