The Ecommerce Website Development Process: Every Stage, Every Decision, Every Deliverable
.avif)
The Ecommerce Website Development Process: Every Stage, Every Decision, Every Deliverable
Ecommerce website development process is the foundation of a successful online store. It shapes your timeline, budget and ultimately how well your store converts.
Most project delays and cost overruns happen because of poor planning rather than technical issues.
This Suplex guide explains every stage of the ecommerce website development process, what decisions are made, and what both you and your agency need to do to keep the project on track and launch a high-performing store.
Before The Process Begins: The Brief That Determines Everything
The brief is the document you hand to a development agency before any scoping, design, or code happens. Vague briefs are the root cause of scope creep, rework, and budget overruns down the line, and a good one doesn't need to be long, just specific.
What A Good Ecommerce Development Brief Contains
A brief that produces an accurate scope covers four areas, and skipping any of them pushes assumptions into the quote that surface later as change requests.
Business context:
- What you sell, to whom, and in which markets
- Your current sales channel (marketplace, existing store, offline) and what role the new site plays
- What success looks like in six months, in specific revenue or conversion terms
Technical inventory:
- Platform being considered or confirmed
- Systems the new store must connect to (ERP, CRM, email, 3PL, accounting)
- Any existing store that needs migration or integration
Catalogue and content scope:
- Number of products, variants, and collections
- Whether product data (descriptions, images, dimensions, attributes) is ready, and if not, when
- Existing brand assets: logo files, typography, colour system, photography
Functional requirements and constraints:
- Features beyond the standard platform (B2B portal, subscription, configurator, multi-language, multi-currency)
- Third-party integrations beyond the app store
- A fixed go-live date, a budget ceiling, and who holds sign-off authority
An agency working from a detailed brief produces a confident, accurate scope. One working from a vague brief produces a quote full of assumptions, and those assumptions become change requests later.
If you can't answer "what does success look like in six months" before design starts, the project will cost more than it should. See custom vs template ecommerce website for how the brief connects to build-type decisions.
Stage 1: Discovery and Strategy
Discovery is the stage most guides skim past, but it's the one that decides whether everything after it runs smoothly or turns chaotic. Treat it as risk management, not paperwork.
What Discovery Actually Is
Discovery is the structured process of documenting everything the development team needs before a single design or code decision gets made.
It's not a meeting, it's a phase, typically 1 to 3 weeks for a standard build and up to 6 weeks for a complex enterprise one, and it produces the blueprint every later stage builds on.
Many brands know they want a new platform but can't fully explain why. Without proper discovery, you risk simply rebuilding your existing problems on a new platform.
What Discovery Produces
Four documents come out of discovery, and they drive everything that follows.
- The Scope Document: A detailed inventory of every feature, integration, and page the store needs, written clearly enough that both sides agree on what's in and what's out. If a feature isn't in the scope document, it's a change request with its own process and cost.
- The Information Architecture: Category hierarchy, collection structure, navigation model, and URL architecture, all built before design starts because navigation, filters, and internal linking all depend on it.
- The Integration Inventory: Every system the store connects to, with data flow direction documented for each. This matters most for ERP: projects that treat ERP integration as a two-week task see cost overruns averaging 189%. An honest inventory here produces an honest timeline.
- The User Flow Map: The customer's documented journey from entry to purchase confirmation, with decision points, page transitions, and error states mapped. You can't wireframe a checkout flow without knowing what happens at each step first.
Your Role in Discovery
Discovery only works with active participation on your side. The agency asks structured questions; you provide accurate answers, not approximations.
Specifically, you need to confirm your integration requirements precisely, hand over your product catalogue structure for the IA exercise, and name your internal decision-makers so the agency knows whose sign-off is required at each gate.
Discovery is the stage brands are most tempted to skip or compress, usually because they're eager to see design work. Every project we've run with a thorough discovery, including a scope document with explicit exclusions, has run predictably.
Every project where discovery got compressed saw scope expand mid-build. The pattern holds regardless of project size.
Stage 2: Platform Selection And Technical Architecture
Platform choice happens after discovery, not before it, and getting this order wrong is the single most common mistake in ecommerce builds.
Why Platform Selection Comes After Discovery
A brand that picks Shopify before discovering it needs 600 variant combinations per product, or picks WooCommerce before discovering it has no developer on staff, has made a platform choice without the information needed to make it correctly.
Discovery produces the integration inventory, functional requirements, catalogue complexity, and operational model, all of which determine the right platform. Platform selection is discovery's output, not its input.
The Platform Decision Dimensions
Five factors decide the right platform for your brand, and skipping any one of them tends to surface as a costly rebuild later.
The Technical Architecture Decision
Beyond the platform, your development team decides how the store gets built, and this decision shapes timeline, team size, and total cost for every stage after it.
- Template-based build: A premium Shopify theme (Impulse, Prestige, Stiletto) configured with brand-specific CSS and content. Fastest, most predictable, right for most brands under $1M revenue.
- Semi-custom build: A premium theme as the structural base, with custom Liquid sections for unique requirements. Best ROI for brands between $500K and $2M revenue.
- Custom theme build: Fully bespoke, built from scratch. Needed when brand differentiation or business logic exceeds what any theme handles.
- Headless architecture: Decoupled frontend and commerce backend, maximum flexibility, highest cost and complexity. Justified for enterprise brands at $5M+ where brand experience is a primary differentiator.
The right answer isn't "what would look most impressive." It's "what build level produces the best commercial return at this stage." See custom vs template ecommerce website, best ecommerce platform for fashion brands and the Shopify Plus migration checklist for more on this decision.
Stage 3: Ux Design And Information Architecture
Design doesn't start with colours and photography. It starts with structure, and that order is deliberate, not a delay tactic.
Ux Design Is Not Visual Design
Wireframing: produces low-fidelity page layouts showing structure, content hierarchy, and navigation placement, with no brand colours, photography, or final typography.
This establishes that the architecture works before visual design starts. Changing a layout at the wireframe stage takes hours. Changing it after visual design is finished takes days.
Prototyping: turns wireframes into a clickable simulation of the customer journey, homepage through category browsing through product page through checkout, letting you test the experience before anything gets built.
Visual Design: applies your brand system, colour, typography, photography, spacing, components, to the approved wireframes. This produces the high-fidelity files your development team builds from.
Design Systems: for custom and semi-custom builds, document every component (buttons, cards, form fields, badges) with defined states (default, hover, active, disabled). This becomes the source of truth for consistency and speeds up every future iteration.
What You Must Provide Before Design Begins
Design starts from your brand assets, and missing any of these pauses the project.
Essential Before Design Starts:
- Final logo files (vector: .ai, .eps, or .svg)
- Brand colour system (hex codes for primary, secondary, accent)
- Typography (licensed font files or confirmed Google Fonts)
- Product, lifestyle, and team photography
- Brand guidelines, if one exists
What Derails Design Mid-Stage:
- Logo colour changes requested after visual designs are produced
- Low-resolution photography that can't be used on the live site
- Typography changes after visual designs are already developed
- Approval requiring sign-off from five or more stakeholders with conflicting opinions
Design by committee genuinely stalls projects. New features requested after development starts create cascading delays even for small additions.
Design Approval: The Gate That Determines Development Quality
Design sign-off is the formal handoff from design to development, and it's a contractual gate, not a suggestion. Development builds from the approved designs; anything requested after that point is a change request, not a revision.
The most efficient approval process has a defined review period (5 to 7 business days per round), a set number of revision rounds in scope (typically 2 to 3), a single decision-maker with final sign-off authority or a clear escalation path, and consolidated written feedback instead of scattered verbal comments in meetings.
Stage 4: Development And Integration
Development is where approved designs become a working store, and the client's role here is often misunderstood as simply waiting.
What Development Actually Involves
Theme Development:builds the Liquid templates, sections, blocks, and JavaScript that turn visual designs into a functioning Shopify theme, from scratch for custom builds, on top of a premium theme for semi-custom ones.
Platform Configuration: sets up the store's commercial infrastructure: shipping zones, tax settings, payment gateway connections, collection structure, product data import, and app installation.
Integration Development: connects the store to third-party systems, email marketing (Klaviyo, Mailchimp), analytics (GA4, Meta Pixel), ERP, CRM, loyalty, subscriptions, and reviews. Each integration has a build phase and a testing phase to confirm data flows correctly both ways.
Content Implementation: loads product data, category descriptions, static pages, blog content, and metadata, running in parallel with development but depending entirely on your content being ready.
Your Role During Development
The most common misconception is that your job is to wait. It isn't. Development runs efficiently when you're active on three fronts.
- Content Delivery: Product descriptions, photography, category content, and metadata should arrive during development, not at the end of it. The three most common delay causes are scope creep, integration surprises, and content delays, development sitting idle waiting on you.
- Staged Review: Most agencies show working sections during development through staging reviews. Attend promptly, test what's shown, and give written feedback within the agreed window.
- Third-Party Account Access: Integrations need API credentials and account access from third parties. A Klaviyo integration needs Klaviyo keys. A payment gateway needs a live, approved account. Delays in providing these are delays in your project.
The Integration Sequencing Rule
Integrations have dependencies, and building them out of order creates rework. The correct sequence:
- Core commerce (payment, tax, shipping), launch-critical, nothing else matters if checkout fails
- Analytics and tracking (GA4, Meta Pixel), needed early to capture data from the first test transaction
- Email marketing (Klaviyo), needed for automated flows from launch day
- Reviews platform, needed for display and collection at launch
- ERP and inventory sync, the most technically complex, needs the most testing time
- Non-critical apps (loyalty, upsell, referral), can wait until after launch if the timeline is tight
ERP-connected projects average 189% cost overruns when integration complexity is underestimated at scoping. The fix: scope ERP as its own workstream, with dedicated discovery, a dedicated developer, and a dedicated testing protocol, not a line item buried in general development.
Staging: The Technical Safety Net
All development happens on a password-protected staging copy of the store, visible only to the agency and you.
Staging allows design and development review without public visibility, integration testing without touching live operations, full checkout testing with Shopify's test mode and performance optimisation before launch. Nothing goes live until staging is reviewed and signed off.
Stage 5: Content, Qa, And Pre-Launch Testing
This stage compresses first under timeline pressure, and it's where the most expensive post-launch problems begin.
Content Readiness: The Launch Blocker Most Brands Underestimate
Content isn't something added after the site is built. It's a parallel workstream that has to be finished in time for development to use it, and fully ready before QA means anything. The single biggest cause of ecommerce project delays is content not being ready when development finishes, especially photography, descriptions, and structured product data.
The Content Inventory For A Standard Launch:
- Product Data: name, description, price, SKU, variants, metafields, attributes, category, weight and dimensions
- Product Photography: hero image, additional angles, lifestyle shots, swatch images for every product going live
- Collection Descriptions: 100 to 150 words per collection for SEO
- Meta Titles: and descriptions for all product, collection, and key static pages
- Static Pages: About Us, Contact, Returns, Shipping, Terms, Privacy
- Blog Content: if content is part of the launch SEO strategy
Set a content freeze date in the project plan, the point after which no new products or changes get incorporated into the launch build.
Anything submitted after freeze goes into a post-launch iteration. Brands that treat content deadlines as flexible produce projects that slip.
QA: What Comprehensive Testing Covers
QA is structured, checklist-based testing to ensure the store works as planned before launch.
- Functional: Test the complete customer journey, product variants, cart, checkout, payments, discounts, and transactional emails.
- Cross-device: Verify Chrome, Safari, Firefox, and Edge on desktop, iOS, and Android, with extra focus on mobile checkout.
- Performance: Check Core Web Vitals (LCP, INP, CLS) and ensure page speed and app scripts meet performance targets.
- Integrations: Validate payment gateways, GA4, Meta Pixel, and abandoned cart flows with real test orders.
- SEO: Verify meta tags, canonicals, redirects, sitemap, structured data, and indexing settings.
- UAE/Gulf: Test VAT pricing, COD, Tabby/Tamara, Arabic RTL, UAE address formats, and successful AED transactions.
UAT: Your Testing Responsibility
UAT is your formal review of the staging store against the scope document, distinct from the agency's QA in that it confirms the delivered product matches what was agreed.
A well-run UAT has a defined window (5 to 7 business days), a formal sign-off document you complete at the end, feedback organised by severity (blocker, important, minor), and a single lead responsible for completion rather than eight people submitting notes independently. UAT sign-off is the formal trigger for launch prep. Without it, the launch date isn't confirmed.
Stage 6: Launch
Launch day is a controlled execution of a documented plan, not an improvised event, and most launch-day disasters trace back to a step that got skipped.
Pre-Launch Preparation, The Week Before Go-Live
- Final content audit: all product data, descriptions, meta titles, and static pages finalised, content freeze enforced
- Redirect implementation: all 301 redirects verified working in staging for migration projects; missing redirects on launch day destroy months of organic ranking
- Analytics verification: GA4, Meta Pixel, and Google Merchant Center feed all confirmed with test orders
- DNS preparation: registrar access confirmed, TTL reduced to 300 seconds 24 hours before cutover for faster propagation
- Stakeholder communication: marketing, customer service, and operations briefed on timing and who to contact if something breaks
Launch Day Sequence
- Remove staging password protection
- DNS cutover, point domain to the new store
- Wait for propagation (typically 5 to 30 minutes with low TTL, up to 48 hours in slow cases)
- Verify SSL is active on the live domain
- Place a live test transaction immediately after propagation, real card, real checkout
- Confirm the payment gateway is in live mode, not test mode
- Confirm GA4 and Meta Pixel are firing on the live domain
- Submit the XML sitemap to Google Search Console for new or migrated domains
- Send customer notification if applicable
- Monitor for error reports in the first two hours
The Most Common Launch-Day Errors
- Payment gateway left in test mode. Every real order fails silently. This is the most common Shopify launch mistake, the toggle is easy to miss.
- Missing 301 redirects on high-traffic URLs. Organic visitors hitting 404s are lost immediately. Check Search Console crawl errors in the first 24 hours.
- Analytics firing on the wrong domain. Common when GA4 or Meta Pixel was configured for staging instead of live, sending launch-day data to the wrong property.
- SSL not active. Rare on managed platforms but severe, browsers show security warnings and no visitor proceeds to checkout.
Related: Shopify store launch checklist.
Stage 7: Post-launch optimisation
Post-launch isn't the end of development. It's the start of the commercial optimisation cycle, and the phase that determines whether the investment actually pays off.
The 30-Day Post-Launch Monitoring Window
The first 30 days carry the highest risk. Traffic patterns are unfamiliar, edge cases QA missed surface under real customer behaviour, and analytics starts producing genuinely actionable data for the first time.
Days 1 To 7, Immediate Monitoring:
- Conversion rate: track daily against any pre-launch baseline. A 5 to 15% dip in week one is normal as users adjust. A dip over 20% signals something broken, investigate immediately.
- Crawl errors: check Search Console daily for 404s on high-traffic pages; add a 301 redirect immediately for anything that had meaningful pre-launch traffic.
- Customer service tickets: categorise every request. "Can't complete checkout" is a blocker. "Image looks blurry" is a quality issue. "Can't find product X" is a navigation issue. Each category points to a specific fix.
- Payment success rate: monitor in the gateway dashboard; below 90% signals a checkout configuration problem needing immediate attention.
Days 8 To 30, Data-Led Iteration:
- Funnel analysis: build session-to-purchase funnels in GA4 or Shopify Analytics and find the stage with the highest drop-off. That's your first optimization priority.
- Heatmap review: Hotjar or Microsoft Clarity on the homepage, top collection page, and top product page reveal scroll depth, click patterns, and rage-click events, directing your first round of post-launch design fixes.
- Site search analysis: zero-results queries and search exit rates point to catalogue gaps or navigation vocabulary that doesn't match how customers actually search.
- SEO monitoring for migrations: track keyword trends in Search Console; some volatility in the first two to three weeks is normal, sustained drops past that point signal a technical issue, missing redirects, noindex tags, or canonical errors.
The Continuous Improvement Cycle
A launched store is not a finished project. It's a living commercial asset: running A/B tests on product pages, iterating checkout based on conversion data, adding content around organic keyword opportunity, and adding features as the business grows.
Every optimisation that follows, a new checkout upsell, a redesigned collection page, a new CRM integration, follows the same basic pattern: brief, scope, design where needed, build, test, launch, monitor.
The Development Process For UAE And Gulf Market Stores: What Changes
UAE builds carry three considerations that generic development guides never mention, and skipping any of them shows up as a store that technically works but doesn't convert its actual market.
Arabic Localisation As A Stage 3 Decision, Not A Stage 4 Addition
The most common UAE development mistake is treating Arabic as a translation task bolted on after the store is built. Arabic RTL is a design system decision that belongs in wireframing (Stage 3), not a CSS toggle applied at the end.
A store built in English and then "Arabic-enabled" through a translation app ends up with navigation that reads right-to-left but interacts left-to-right, filter sidebars on the wrong side, carousels advancing the wrong direction, and breadcrumbs pointing backward.
It technically displays Arabic while navigating like an English site, which tells Arabic-preferring shoppers they aren't the primary audience.
The Correct Sequence For A Bilingual Uae Store:
- Stage 1: Confirm Arabic as a co-equal language in the scope, not a secondary translation
- Stage 2: Select a platform and theme with native RTL support
- Stage 3: Design both language versions together, with RTL-native layout decisions throughout
- Stage 4: Build RTL into the theme from day one, not as a later override
- Stage 5: Test the Arabic version with the same rigour as English, on a real device, with a native speaker
UAE Payment Gateway Configuration Sequencing
UAE gateways, Telr, PayTabs, Tap Payments, Network International, require merchant account applications that take 5 to 15 business days to approve depending on the gateway and your trade licence status. This process needs to start at Stage 2, at the latest.
The most common UAE delay agencies can't control is a gateway approval still pending when the store is otherwise ready. Submit applications as soon as your trade licence and gateway choice are confirmed, not once "the store is nearly ready."
Halal And Regulatory Content As A Content-Phase Requirement
For UAE food, beauty, supplement, and fashion brands, the content phase (Stage 5) must include halal certification badges and documentation for eligible products, Dubai Municipality approval display where required for food,
UAE FTA-compliant VAT categorisation (standard-rated, zero-rated, or exempt). These are content requirements, but they need to be ready before QA starts and verified in the UAE-specific QA checklist.
The Ecommerce Development Process Checklist, Stage By Stage
Use this as a working reference, and share it with your internal team before a project kicks off. Responsibilities are marked client or agency.
How We Run The Ecommerce Development Process At Suplex
This is the ecommerce website development process we follow for every project, from standard Shopify stores for growing D2C brands to complex Shopify Plus builds for enterprise businesses across the GCC.
We spend the most time on discovery because it defines the project's scope, information architecture, integrations, and business requirements before design or development begins. That early planning prevents scope creep, reduces delays, and avoids the budget overruns caused by late changes.
The projects that struggle almost always share the same issues: rushed discovery, unclear requirements, delayed content, and informal approvals.
Together, these create unnecessary revisions and slow down launch. For UAE and Gulf brands, we also build Arabic localisation, VAT compliance, COD, regional payment gateways, and market-specific QA into the process from the beginning, ensuring the store is ready for local customers on day one.
This framework has been refined through successful Shopify projects across fashion, beauty, supplements, and B2B ecommerce, delivering stores that launch on time and perform commercially.
If you're planning a build or rebuild and want to know what the process looks like for your specific situation, how long each stage takes, what your team needs to prepare, and which build approach fits, our platform consultation starts with the brief and the discovery, not a proposal.
Frequently Asked Questions
What is the ecommerce website development process?
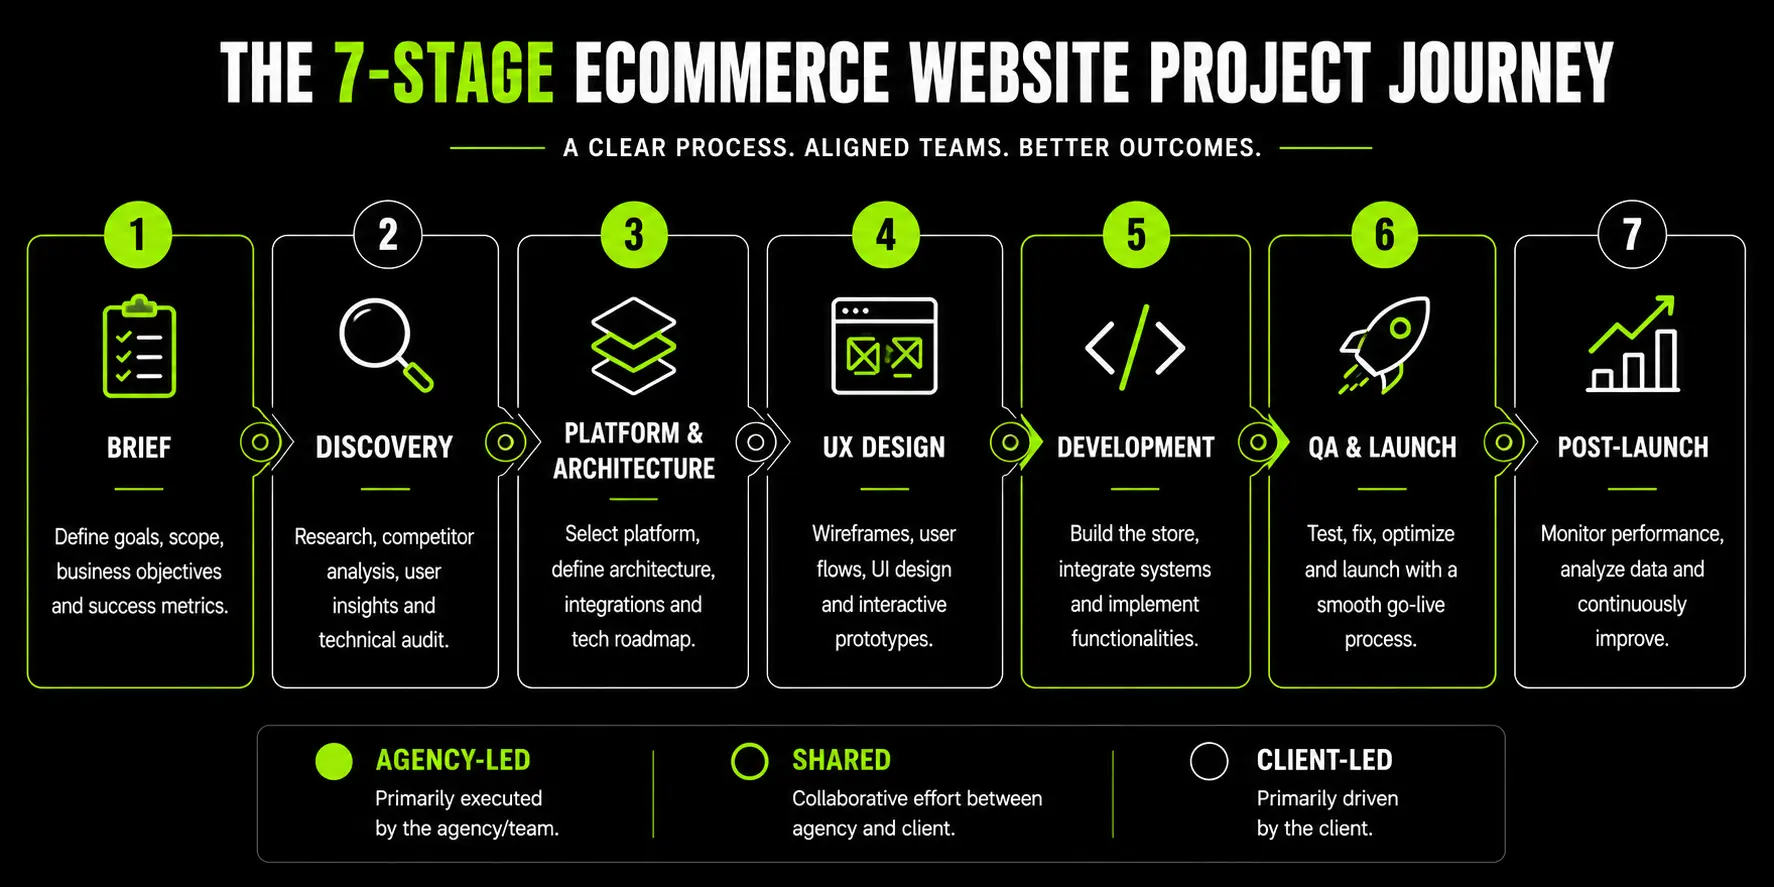
The ecommerce website development process has seven stages: planning, discovery, platform selection, UX design, development, QA, and launch. Each stage includes defined deliverables, approvals, and testing to keep the project on track.
How long does ecommerce website development take?
Most ecommerce projects take 8–16 weeks. Template stores can launch in 4–6 weeks, while custom builds and migrations may take 10–20 weeks, depending on complexity.
What are the stages of ecommerce website development?
The seven stages are: pre-project planning, discovery, platform selection, UX design, development, QA and UAT, and launch with post-launch optimisation.
What does a client need to prepare for an ecommerce development project?
Prepare a detailed project brief, brand assets, product data, third-party access, and assign a decision-maker for approvals. Having these ready helps avoid delays.
What causes ecommerce website projects to go over budget?
The biggest causes are scope creep, unexpected integration complexity, and late content delivery. Clear planning and early preparation prevent most overruns.
What is the difference between QA and UAT?
QA is the agency's testing to ensure everything works correctly. UAT is your review to confirm the store meets the agreed requirements before launch.
What are the specific ecommerce development considerations for UAE stores?
UAE stores should support Arabic RTL, VAT-inclusive pricing, COD, Tabby/Tamara, local payment gateways, UAE address formats, and market-specific QA before launch.
Hi, I’m Rishabh Jain
I believe great design has the power to shape perception, build trust, and move businesses forward. That belief is what led me to found Suplex Design Studio, a global branding and packaging studio working with FMCG and D2C brands across markets.I started suplex at 25 with a clear intent, to create design that is strategic, thoughtful, and commercially meaningful. By 28, the studio had scaled globally, guided by a strong foundation in Integrated Design that I developed during my academic journey in London, where I was honoured with the Dean’s Award.
Over the years, I’ve had the opportunity to work with 100+ brands, from Fortune 500 organizations to family-run businesses, helping them build packaging and brand systems that create recall, relevance, and long-term value.
Suplex’s work has been recognized internationally, including the Manifest Award (2024), the Clutch Global Award (2025), and features on platforms such as Packaging of the World, The Dieline, and the World Brand Design Society.
None of this would be possible without the people behind the work. I’m deeply grateful to the suplex team, whose commitment, creativity, and attention to detail turn ideas into meaningful brand experiences every day.
At the heart of my work is a simple philosophy, design should be intentional, honest, and built to last, and that continues to guide everything we create at suplex.































Let’s Make It Happen
E-Commerce Success Stories
%201.avif)






.avif)
.avif)
Build Your D2C Business The Right Way
Build It With Suplex.


